Overview
ESC-Scheduler is a web application that does not require any client-side installation. Entering the link where ESC-Scheduler is running (e.g. localhost:80) takes the user to the login screen.
Login
- Enter the username and password
(the admin user was initially set in thedocker-compose.ymlfile).- Click on Login
Home
After a successful login, the user is redirected to the home site of the ESC-Scheduler. Right after the setup, this site does not display much. Later on, the home site will display the active, latest and next jobs that are scheduled. A job is nothing else than a start or stop command that shall be executed at a specific time for a particular virtual machine.
At the top of each page, the navigation is displayed as shown below:

Jobs
The menu item Jobs offers the possibility to get an overview of the different jobs that were executed on the one hand, but also the ones that will be executed in the future on the other hand. Users have the choice between four menu items, namely All jobs, Active jobs, Past jobs, and Future jobs.
Active Jobs are jobs that are currently running or will run within the next "tick", meaning they are scheduled to run as soon as the next job batch is scheduled to run. This is usually every 5 minutes but can be changed in the General Settings.
Example of the job overview All jobs:
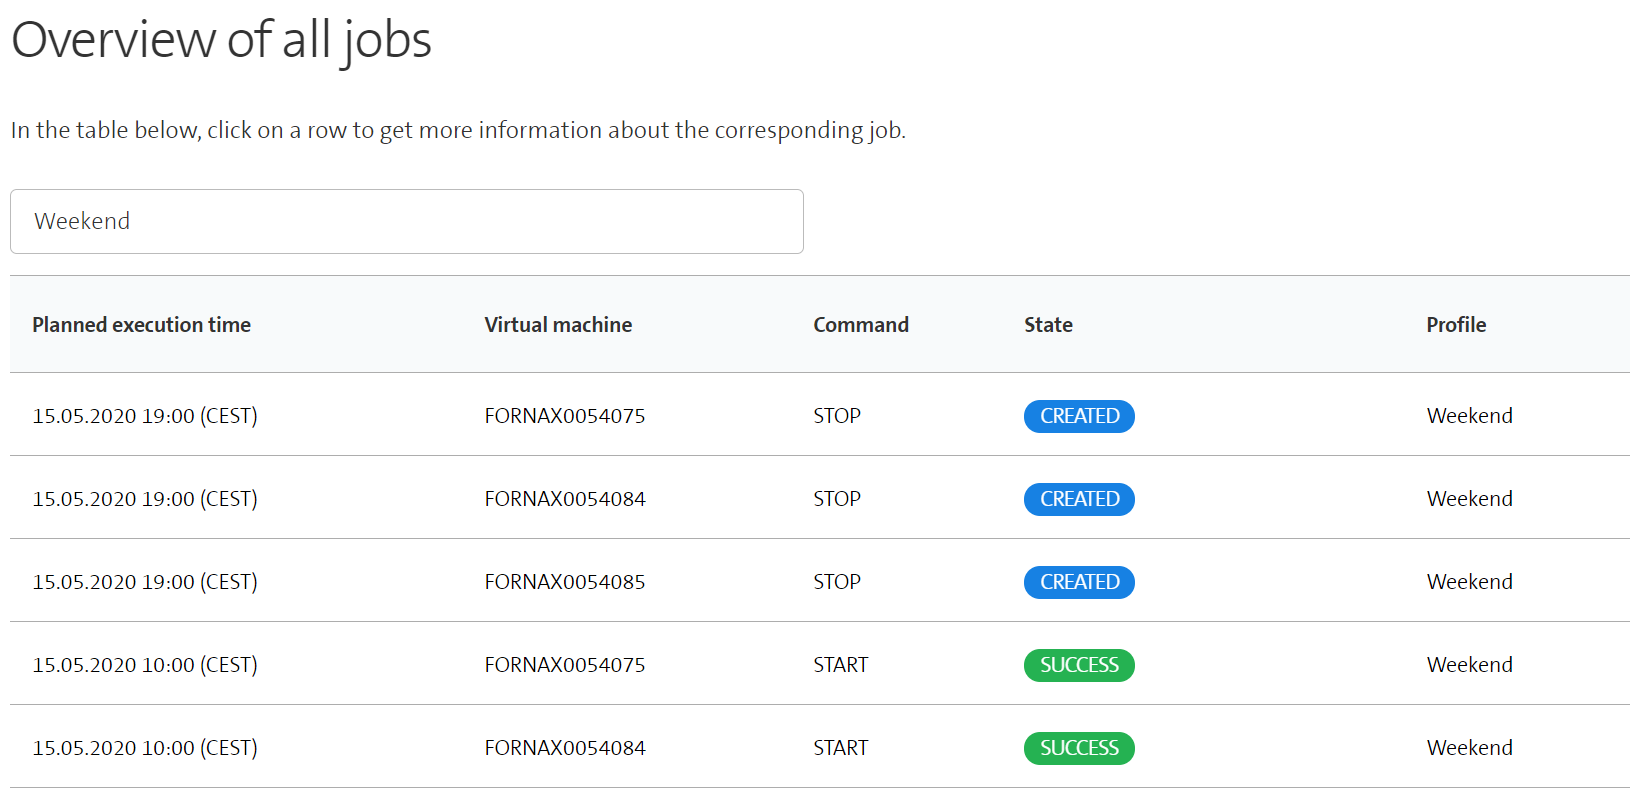
In this example of All jobs, the first three jobs are scheduled for the future, while the last two have already been executed successfully. All three job overviews offer a search field that can be used to filter the table.
Job details
In all three job overviews, users can display details to a job by clicking on the corresponding table row. The displayed details encompass the VM name, the profile of the VM, the command (start or stop), the execution time, and the state of the job.
An example for the job details looks as follows:

Each job has always one of the following seven states:
CREATED: The job has been scheduled, but it is not yet time to execute it.
PENDING: This state is set when the execution of the job starts. In a first step, it is checked whether the virtual machine is in the right state to execute the job. At the time where the command is eventually sent to vRA, the job state changes to RUNNING.
FAILED: One of the two end states. It indicates that something went wrong with the job execution. The recorded message will tell users what went wrong in the execution.
SUCCESS: The second end state indicating that the corresponding VM was successfully started or stopped.
RUNNING: The corresponding start or stop command has been sent to the virtual machine over the vRA API and the action is currently executed in vRA.
SKIPPED BY SYSTEM: Indicates that the job could not be executed because the virtual machine was not in the right state for executing it. For example, because the VM should be stopped but is already turned off.
SKIPPED BY USER: This state is set when users skip a job in the VM details view.
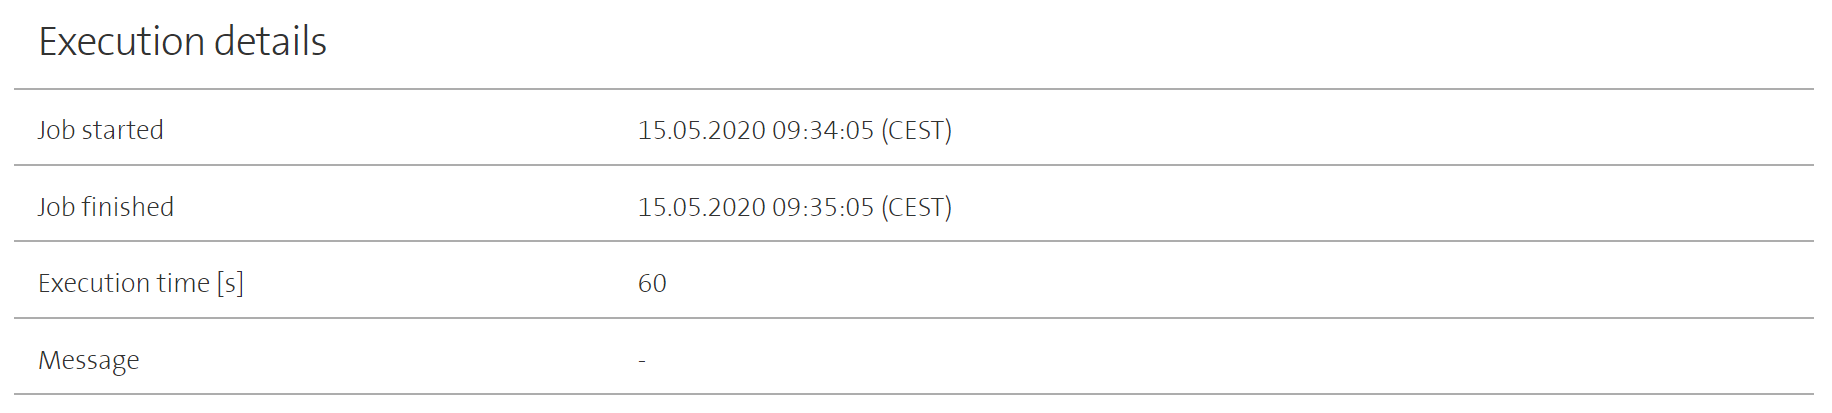
Jobs that have already been executed contain additional information regarding the execution right below the job details. This includes the exact time when the execution has been started as well as the time when the execution finished. Calculated based on these two values, the execution time is displayed as well. For jobs that have been skipped by either the system or the user, the start and finish time will be equal. For all other jobs, the start time represents the moment when the command was effectively sent to vRA. The finish time represents the time when the command execution was completed in vRA.
Jobs that have been skipped by the system or failed contain an additional message with the reason. This message is also displayed at the end of the execution details.
An example of the execution details:
VMs
The VM inventory contains all virtual machines that exist at the moment in vRA and also VMs that have been deleted recently in vRA. The navigation for the VM inventory offers three main categories: All VMs, VMs by profile, and outdated VMs.
All VMs
The menu item All VMs displays a table that contains all currently existing VMs in the ESC-Scheduler. For each VM, the table displays the name, the business group, the currently assigned profile, and the date outdated if the VM was deleted in vRA.
An example of the VM overview:
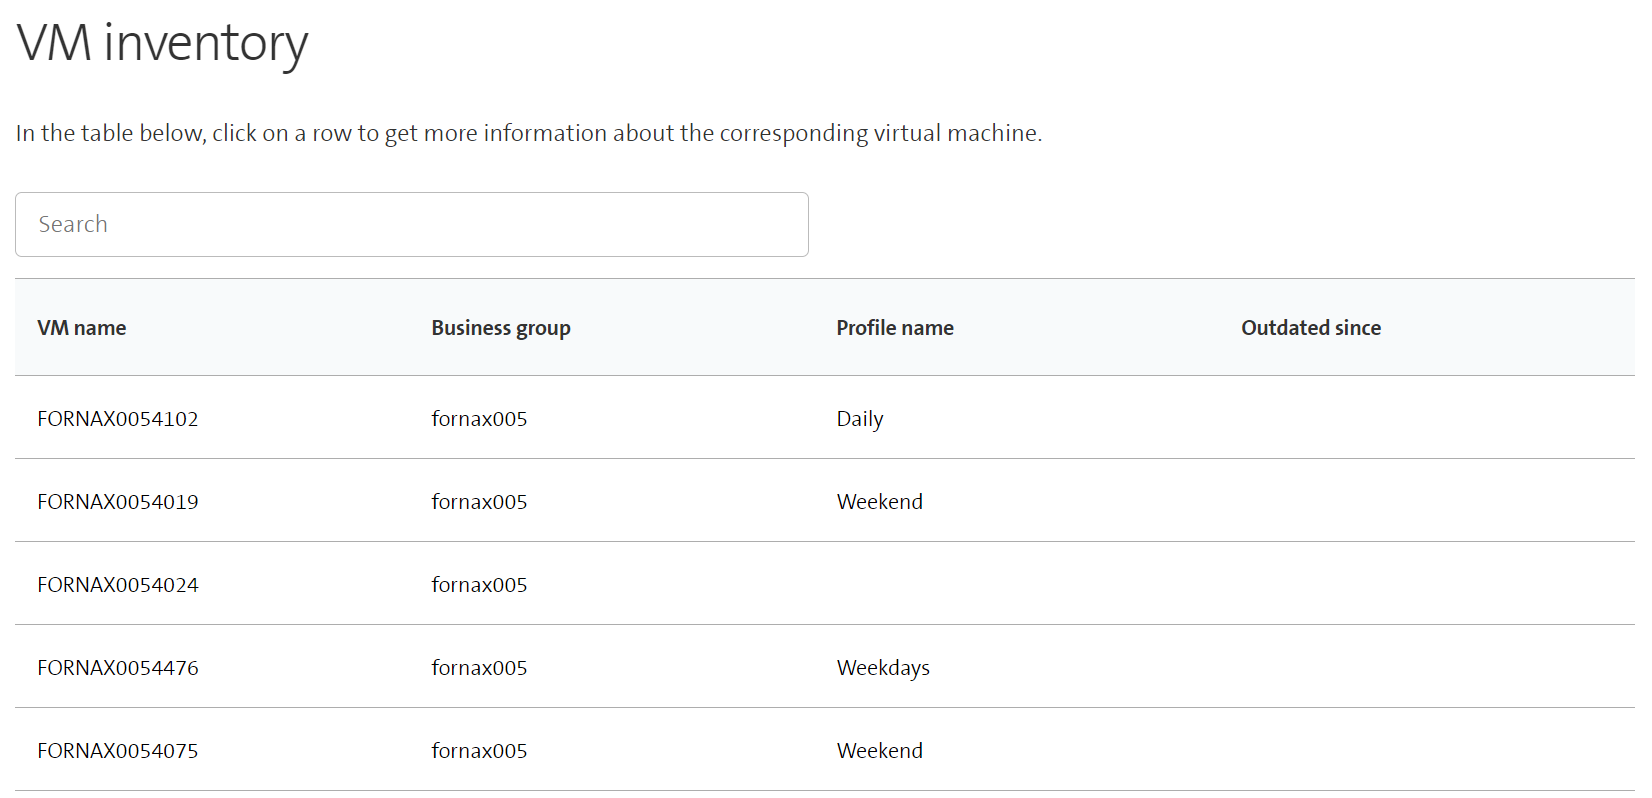
In the example above, all VMs have the same business group, namely fornax-005. However, the VM FORNAX0054102 has assigned the profile Daily, while the VM FORNAX0054476 has assigned the profile Weekdays. None of the displayed VMs was marked as outdated so far.
Additionally, a search field is provided that can be used to filter the table. The displayed table is updated dynamically, i.e. when the content of the search field changes, all VMs fulfilling the current criterion are displayed. Note that the search works for all fields, i.e., VM name, business group, profile, and date outdated.
Outdated VMs
All the outdated VMs can be displayed by clicking on the menu item Outdated VMs. The view together with the search field is the same as for the two previous chapters.
VMs by profile
The VM inventory also provides menu items to display all the VMs that have been assigned to a specific profile. The displayed view is the same table as for the menu item All VMs except that only VMs with the corresponding profile are displayed. The previously mentioned search field is available as well to filter the table for VM name, profile, or business group.
Additionally, it is possible to display all VMs that have no profile assigned by clicking on the menu item VMs without a profile. Similar as before, a table containing all VMs without a profile is displayed together with a search field.
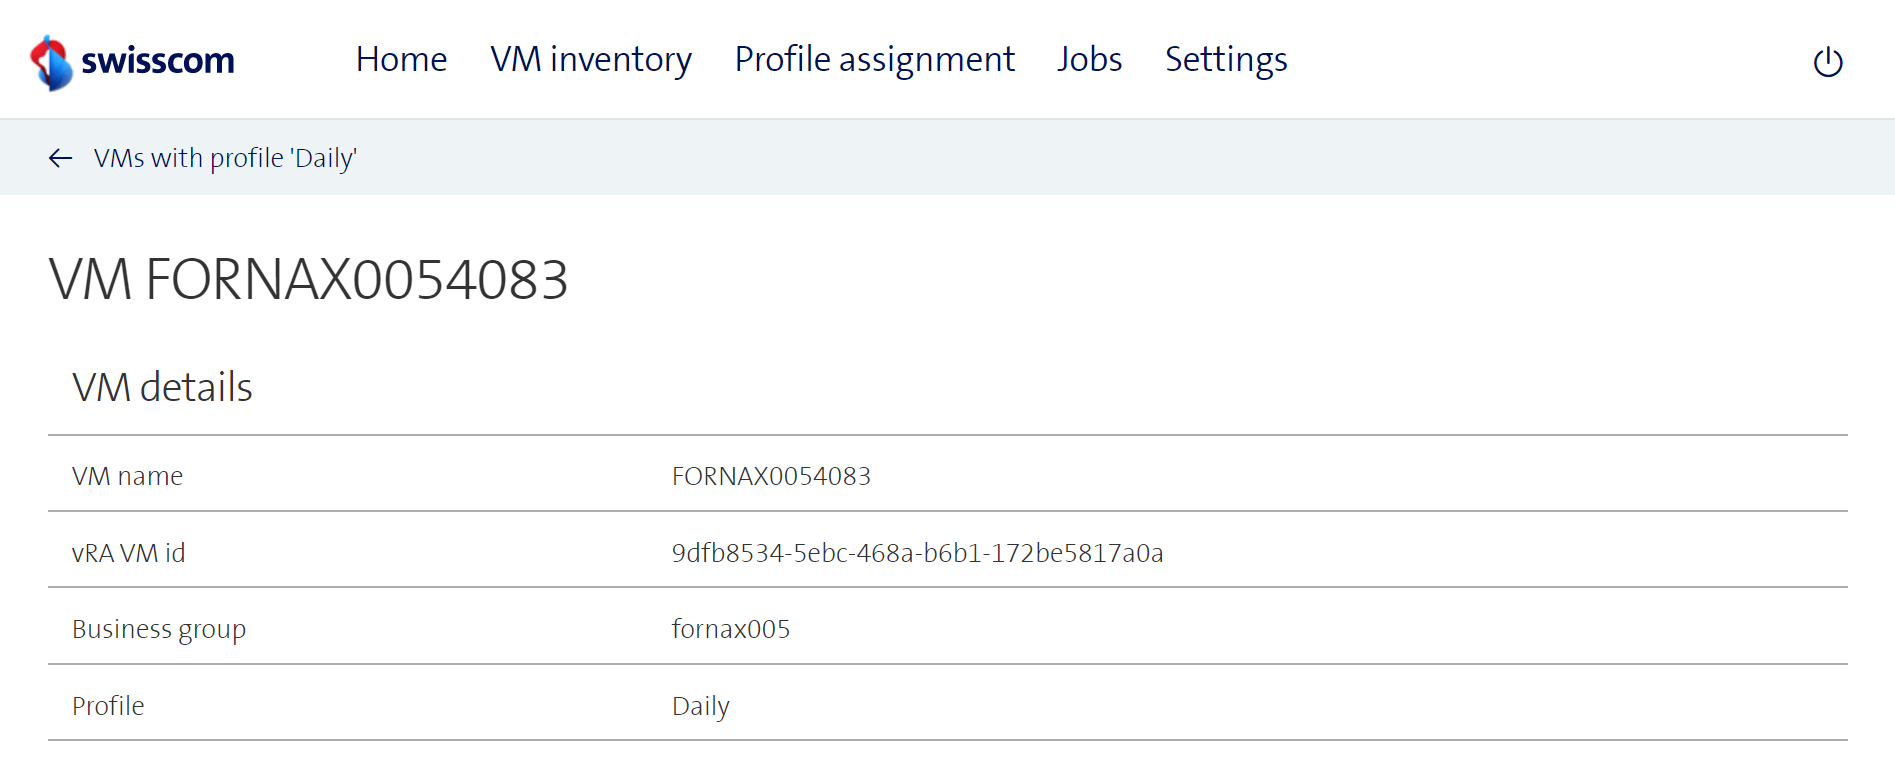
VM details
From each of the three previously explained VM overviews, users can get to the details of a VM by clicking on the corresponding table row. The VM details contain general information about the VM, allow the user to assign or change the profile of the VM, skip the next job for the VM, and display an overview of executed jobs for the VM.
General information
At the top of each page with VM details, the most important characteristics of the virtual machine are displayed. This includes the name, the id from vRA, the profile, and the business group. In case of an outdated VM, the timestamp where it was marked as outdated is also visible.
Example of the VM details:
Profile assignment, Job skipping and Manual Actions
In the middle of the page with VM details, users have the possibility to change the profile of the VM and to skip the next job for this VM.
Profile assignment
The form for changing the profile of the VM is displayed only if the VM is not yet outdated. All profiles that are recorded in ESC-Scheduler are available as options in the form. Furthermore, the option to remove the profile from the VM is present, denoted as None. The current profile of the virutal machine is preselected in the form.
An example of the form looks like this:
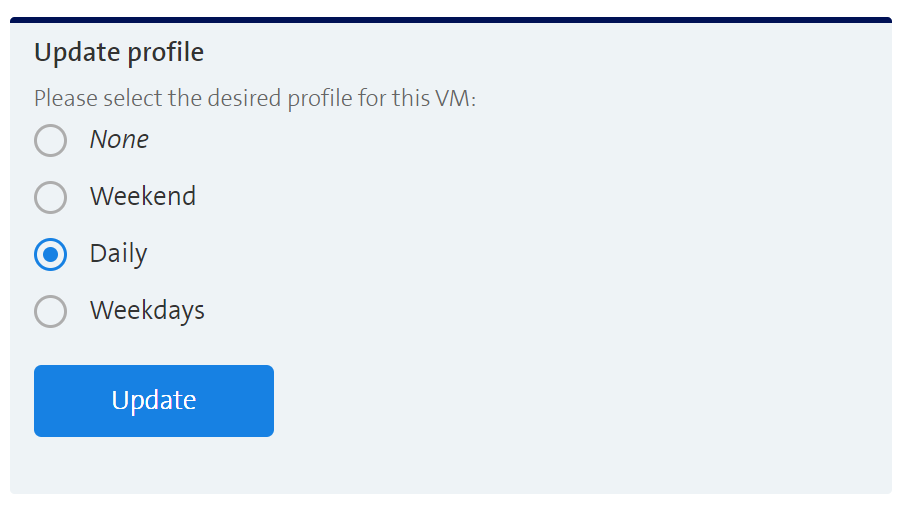
The process for changing the profile of the VM is straightforward:
- Select the desired profile.
- Click on Update.
Skip the next job
For a VM that has assigned a profile, the next scheduled job for the virtual machine is displayed right next to the form for updating the profile. The information encompasses the command that will be executed (start or stop) as well as the time of execution. In case users do not want the corresponding command to be executed, a button for skipping the job is available as well. The application will then simply reschedule the job that needs to be executed after the skipped one.
The form for skipping the next job:
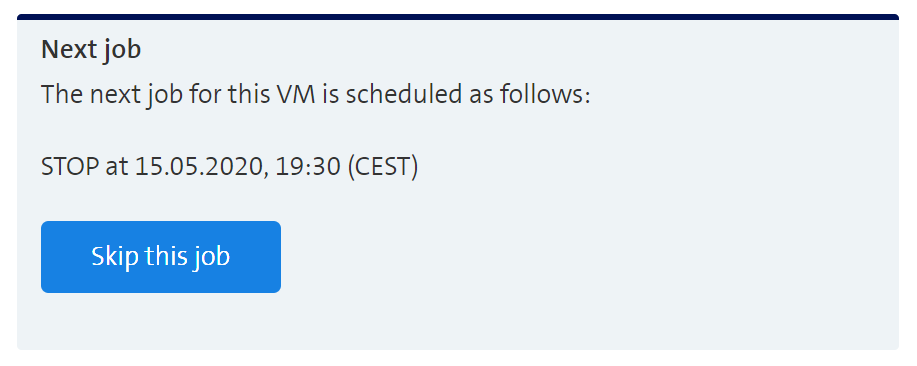
In the example above, the VM will be stopped at the 15th of May at 19:30 CEST. If this job should be skipped, users can simply do the following:
Click on Skip this job.
Manual Actions
Manual Actions let you Start and Stob a VM manually without creating a recurring job. When you click on Start VM or Stop VM a single job gets created that is scheduled to run immediately. It might take 5 minutes (depedning on your settings) for the scheduler to pick up the job and run it, however.
If the VM is already in the state you want it to be, the job will start but fail with an appropriate message.
Executed jobs
At the bottom of the page with the VM details, the already executed jobs for the virtual machine are displayed in a table. For each job, the planned execution time and the effective execution times are indicated. The effective execution times can differ from the planned execution time since the application checks for pending jobs in a given interval as specified in the settings. Further, the command (start or stop), the state of the job, and the corresponding profile are displayed for each job.
An example of the executed jobs in the VM details view:
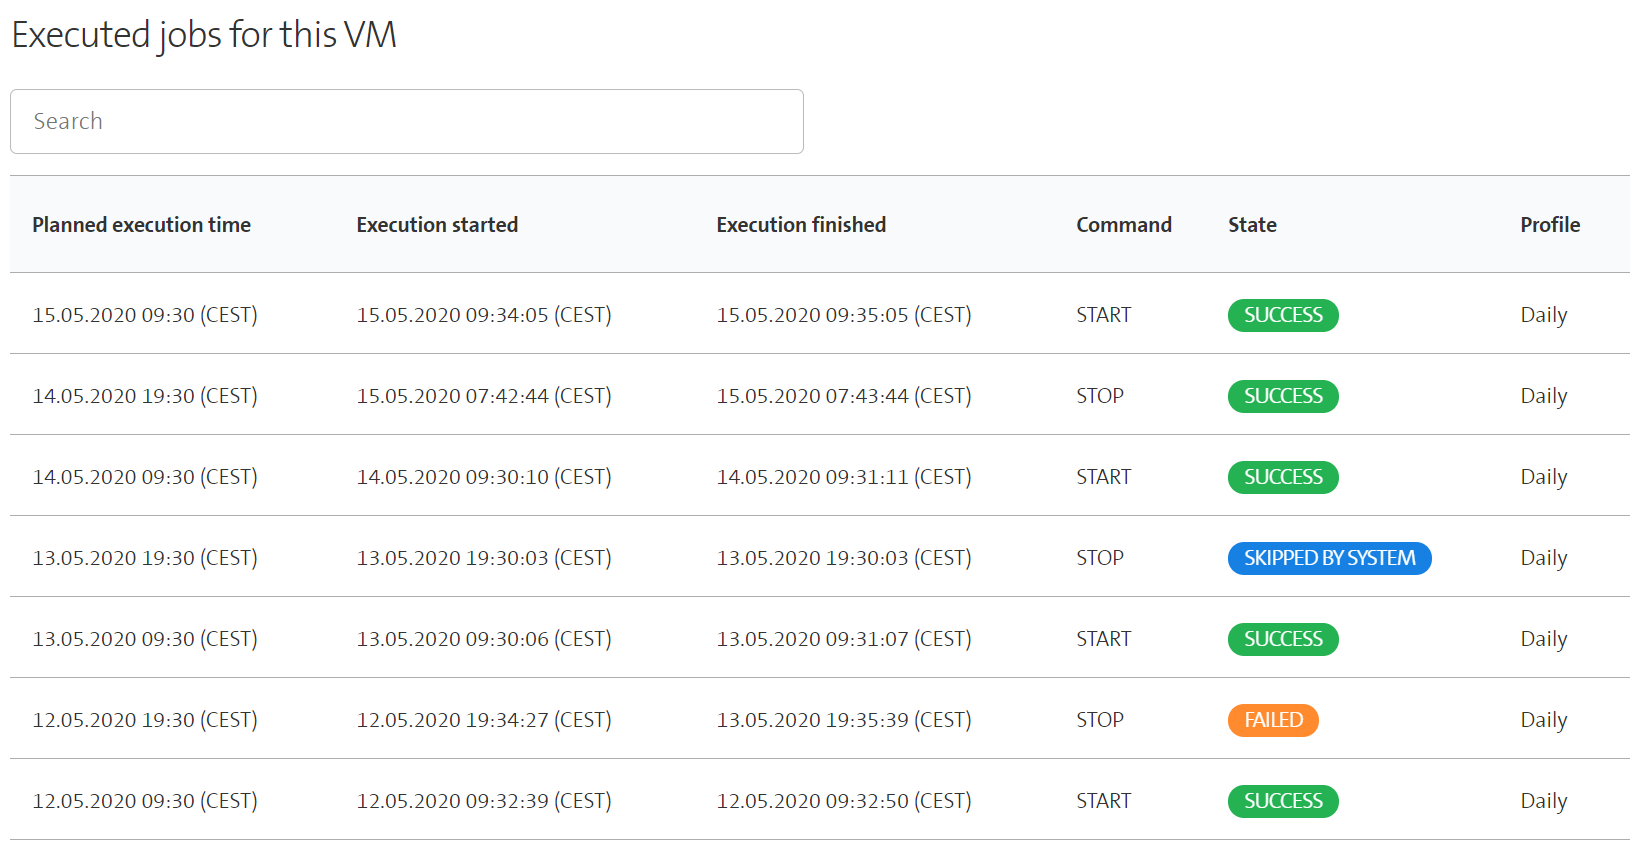
In the example above, all jobs have been executed successfully except for the following two:
The stop command in the evening of the 12th May failed. A failed job usually means that something went wrong in the communication with the vRA API.
In the evening of the 13th May, the job to stop the VM has the state SKIPPED BY SYSTEM. This state indicates that the corresponding job could not be executed since the virtual machine is already in the right state. In this case, the stop command could not be executed since the VM was already turned off at this time.
Users who wish to get more information about the executed jobs and the different job states are referred to the section about jobs.
Profiles
The profiles are the key concept of the ESC-Scheduler and can be assigned to VMs. A profile has a name and defines on which days and at which time the VMs having this profile should be started and stopped. How created profiles can be assigned to a VM will be explained in detail in the next chapter.
There are no profiles predefined in the application at startup. For the following example, some profiles have already been preregistered in the application. To display an overview of all currently recorded profiles, users can proceed as follows.
In the navigation bar, click on Profiles and then Manage Profiles. The following site will load:
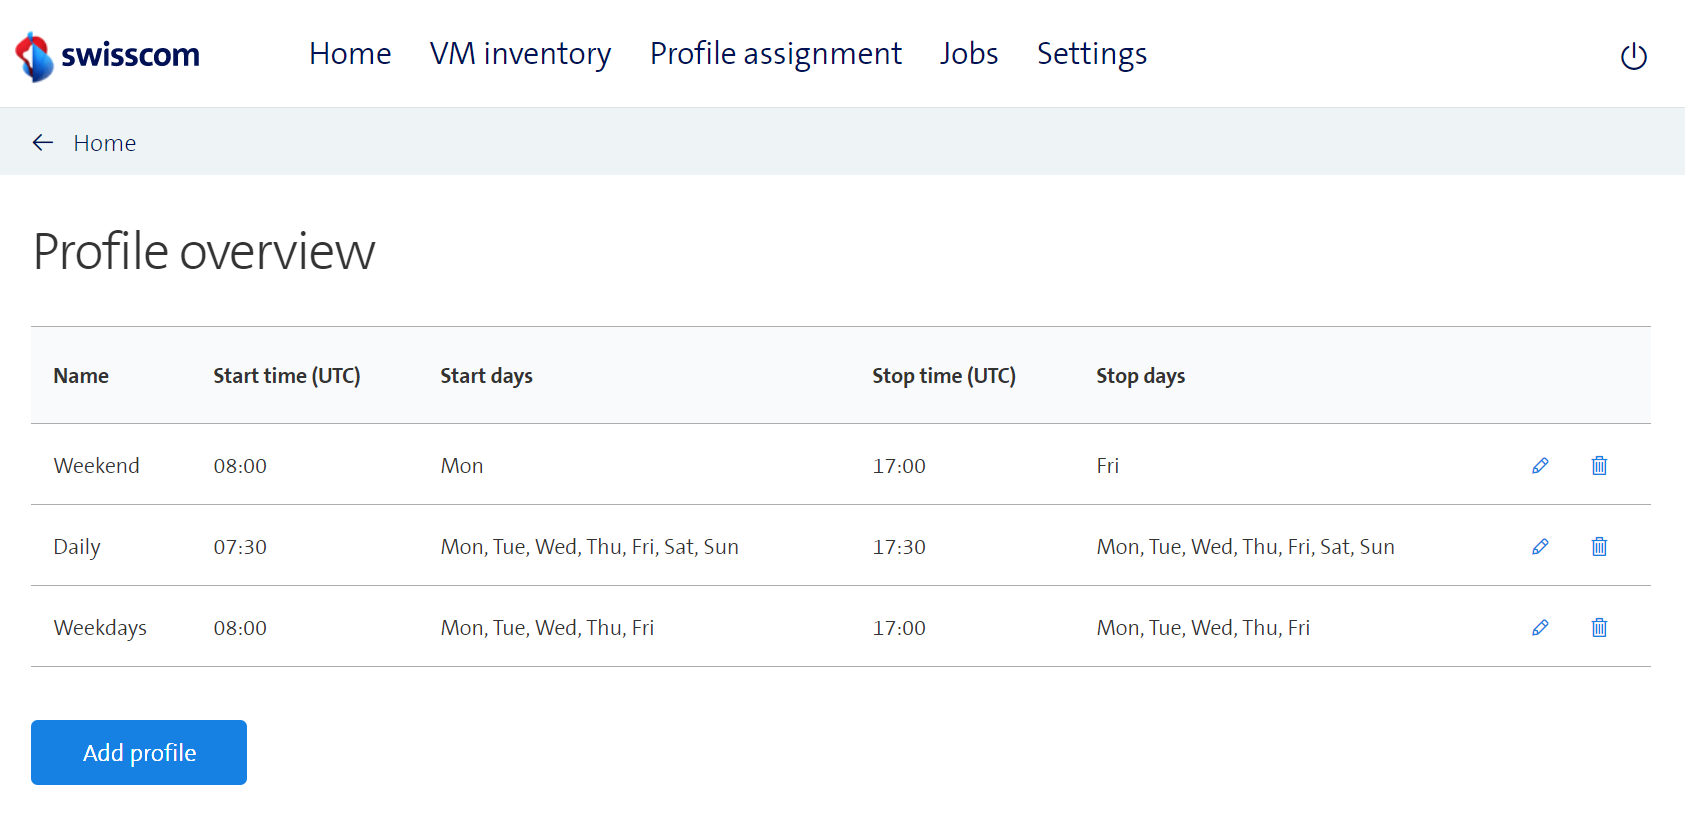
For each profile, it is indicated at what time the VMs having this profile will be started and stopped and on which days these operations will happen. For example, VMs having the profile Weekdays will be started each day except on Saturday and Sunday at 8 o'clock. Similarly, all these VMs will be shut down on every day except on the weekend at 17 o'clock. On the other hand, VMs having the profile Weekend will only be stopped on Friday and then started again on Monday.
Add a profile
Profiles can be added directly in the profile overview.
- Click on Add profile
- This will display a form to add a new profile:

This form needs to be filled with the following information:
Name: The name that shall be used for this profile.
Use UTC time: If set to true, the input time is expected in UTC and the scheduler will therefore ignore daytime savings shifts.
Start time: The time at which VMs with this profile shall be started.
Start days: Select all days where the VMs having this profile shall be started at the specified start time.
In the second half of the form, the stop time and the days on which a stop command shall be executed need to be specified in a similar manner.
After all values are entered, click on Save to add the profile.
The application will then redirect users to the profile overview where the newly created profile should be visible.
Edit a profile
Profiles can easily be changed by clicking on the pencil icon at the end of the row in the profile overview. The same form that is used for adding a profile will then be displayed, but already filled with the values that are currently recorded for this profile.
Delete a profile
A profile can be deleted directly in the profile overview by clicking on the trash icon at the end of the corresponding row. For all VMs having the corresponding profile at the time of the deletion, the profile will be set to nothing and all future jobs scheduled for the VMs will be deleted immediately.
Especially at the first setup of the ESC-Scheduler or when a huge amount of VMs shall get the same profile assigned, the way via the VM details is cumbersome. The ESC-Scheduler offers a more efficient way to change the profile of several virtual machines at once. In practice, the navigation item Profiles offers the possibility to assign one of the existing profiles to a set of VMs at once. In a similar way, the profile can be removed from several VMs at once.
In the remainder of this chapter, the assignment of a profile named Weekend to several virtual machines will be explained as a representative example.
- In the navigation, click on Profiles and then Profile Weekend. The following form will be displayed.
- Select all VMs for which the profile Weekend shall be assigned and click on Save.
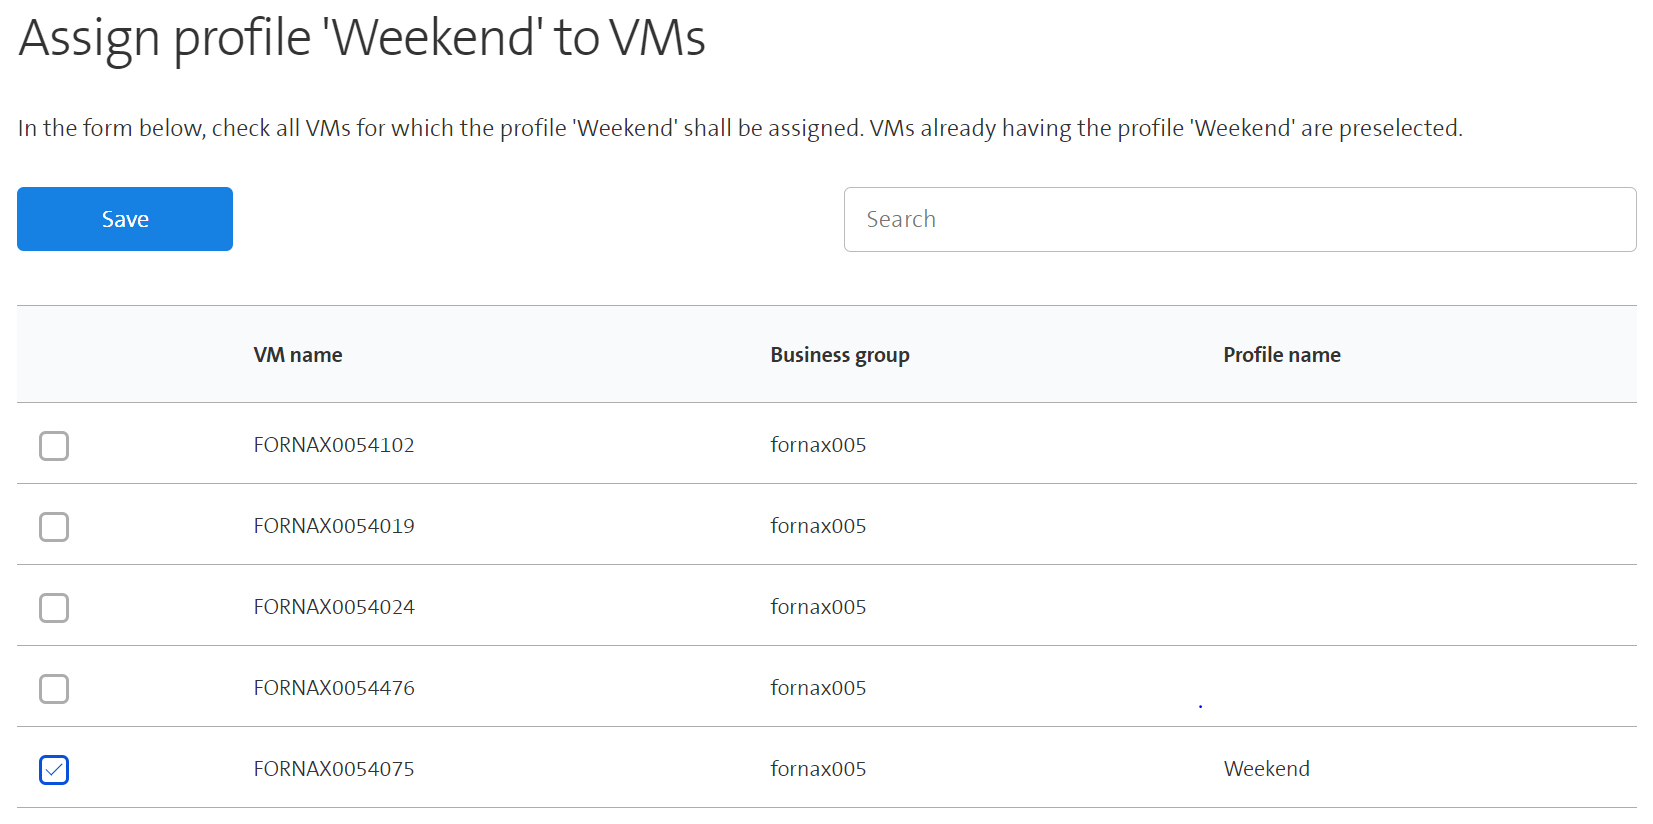
As can be seen in the example, VMs already having assigned the profile Weekend are preselected. In case that such a VM is deselected, the profile will be removed from the corresponding virtual machine, i.e. this VM will not have a profile assigned anymore.
Similar as in the VM overview, a search field is present that can be used to filter the table for the different attributes.
In order to make the application behave correctly, some initial configurations need to be adapted in the Settings.
General settings
The general settings are necessary to specify several parameters needed for running tasks in the backgrounds.
- In the navigation bar, click on Settings
- Click on General settings. The following form will then be displayed:
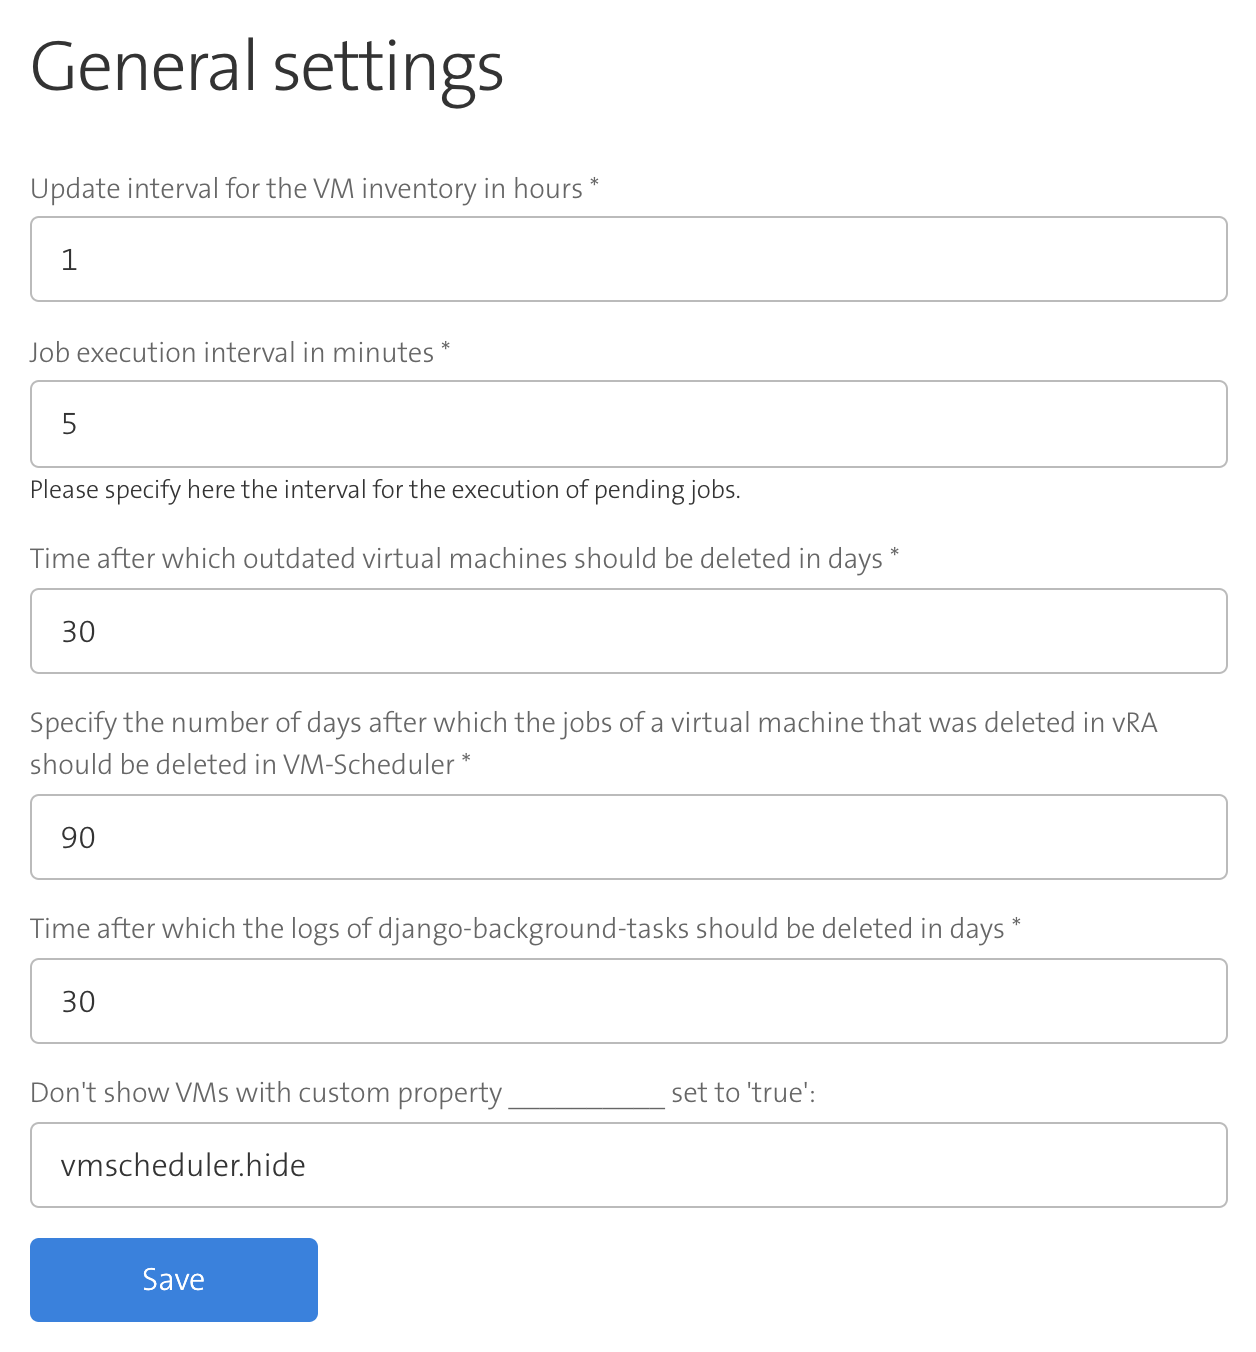
In this form, the following values can be entered:
VM inventory update interval: The interval in which the VM inventory of the ESC-Scheduler shall be compared and updated with the newest values in vRA. The value needs to be specified in hours.
Job execution interval: Specifies the interval in which the application checks for pending jobs and executes them. The smallest possible value for this field is five minutes.
Time after which outdated VMs shall be deleted: When a virtual machine is deleted in vRA, it is not immediately deleted in ESC-Scheduler. In a first step, the VM is just marked as outdated, but remains in the system. After the number of days specified in this field, the VM will eventually be deleted in ESC-Scheduler as well.
Time after which outdated jobs shall be deleted: At the same time the VM is marked as outdated in ESC-Scheduler, all jobs to start and stop the VM that have been executed are also marked as outdated. Similar as before, the jobs will not be deleted immediately, but after the number of days indicated in this field.
Clean-up of executed tasks: The previously mentioned tasks to update the VM inventory, to execute the pending jobs, and to delete outdated jobs and VMs all run in the background. Each time such a task is executed, a corresponding entry is stored in the database. For example, if pending jobs shall be executed every 5 minute, twelve such tasks will be stored every hour. This field can be used to delete these tasks after the indicated number of days to avoid an exorbitant growth of the database.
Don't show VMs with custom property __________ set to 'true': The ESC-Scheduler will not load VMs that have a custom property with this key set to 'true'. This can be used to, for example, exclude production VMs to show up in the VM Scheduler.
After all values are entered, click on Save to update the settings.
API settings
The specified API settings are used to make the calls against the vRA API.
- In the navigation bar, click on Settings
- Click on vRA API settings. The following form will then be displayed:

First, define the vRA URL and vRA Tenant:
vRA URL: The base URL over which the vRA API is reachable. (including
https://)vRA tenant: Name of the tenant for which ESC-Scheduler shall run.
Now you can decide on two ways to authenticate:
Option 1: Username & Password
vRA username: It is recommended to use a generic user and not a personal one for the vRA API calls.
vRA password: The vRA password belonging to the user.
Option 2: OAuth 2.0
OAuth Client ID: The Client ID of the OAuth Client.
OAuth Client Secret: The Client Secret of the OAuth Client.
Ask your Tenant Admin to set up an OAuth Client on your tenant (see here),
After all values are entered, click on Save to update the API settings.
If you selected OAuth 2.0, you will be directed to your identity provider that is set up in vRA and be asked to login. After successful login, you will be redirected to the ESC Scheduler.
External link to the documentation you are currently reading.
Logs out the user.