Overview
Users have the opportunity to order a virtual machine (VM) via the portal.
VM Actions
Below-mentioned actions are possible for a virtual machine. The available actions are sometimes dependent on the state of the virtual machine.
Advanced Reconfigure
The action allows you to change the Service Level, the Location and the Storage Policy.
Changing the service level between Basic and Standard is a light operation, while changing the location or service level to Advanced results in migrating the VM from one cluster to another and might take some time. More information about the Service Level can be found here.
The storage reservation policy per disk can be changed here as well. You can make multiple changes at once. More information about the Storage Policy can be found here.
Business Continuity Test
The Business Continuity Test is enabled for the Advanced Service Level VMs as a new day-2 action. During a test, the Virtual Machine will be powered-off and moved to the opposite location to test site failover.
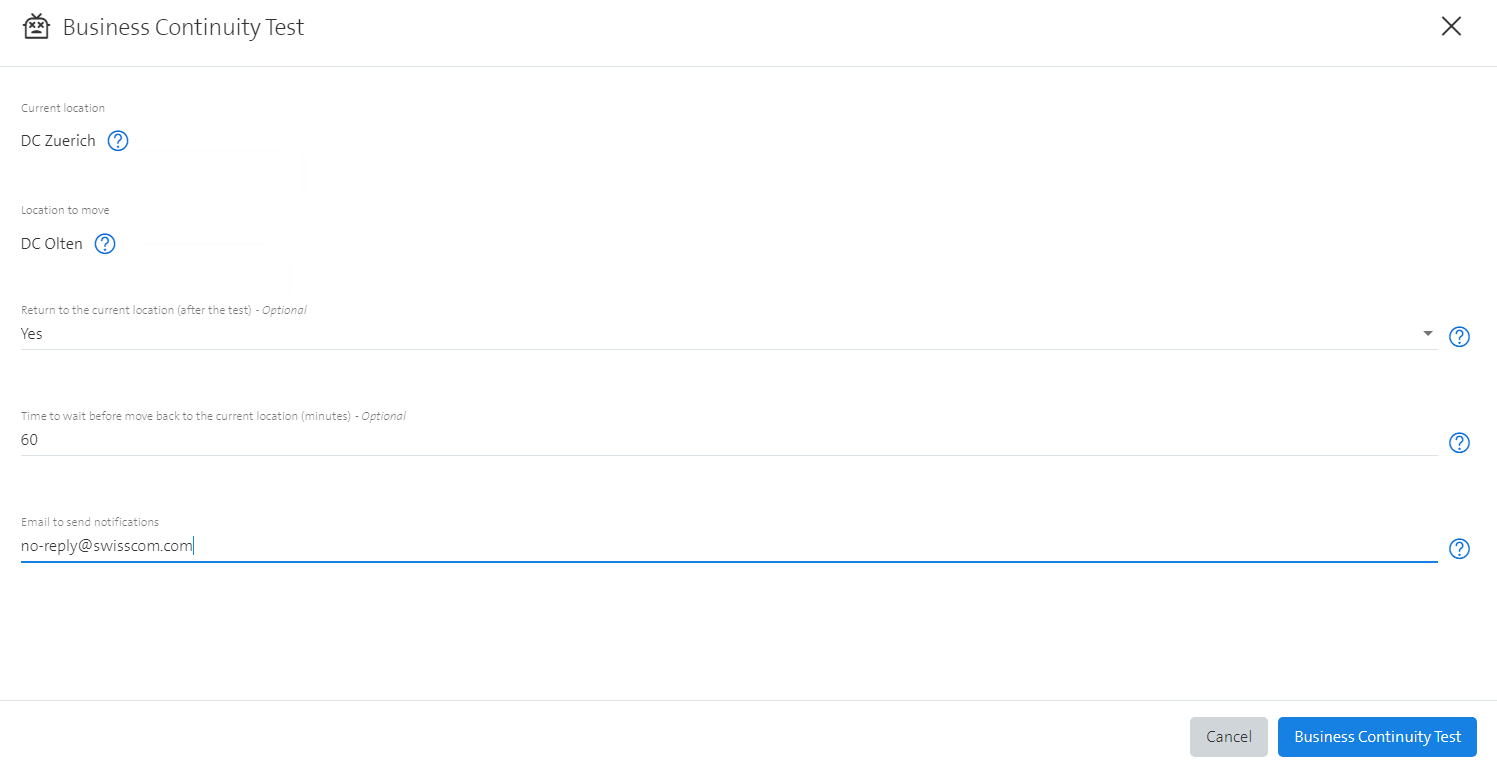
Time to wait before returning to the starting location host can be optionally set (automated rollback). Default is 60' which can be used to make some client/application side verification. After that time the machine will be moved back. You can provide an email address where a notification mail will be sent when "Ready For Testing" and/or the "Test Summary".
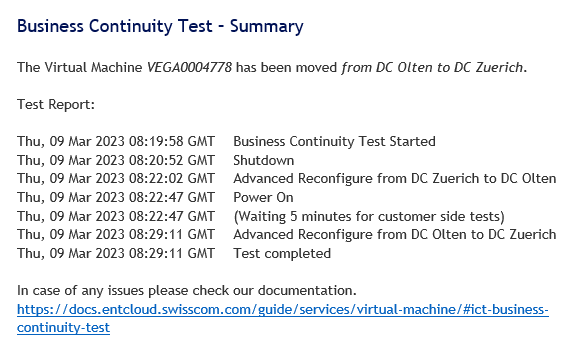
After the test execution you get a mail with the Test Report containing all steps including the timestamps when completed.
Enablement of self-initiated ICT Business Continuity Test on Advanced Service Level VMs: The Business Continuity Test is enabled for the Advanced Service Level VMs as a new day-2 action. During a test, a VM can be moved to its opposite location host to test site failover. Time to wait before returning to the starting location host can be optionally set (automated failback). Notes: The user should provide an email address where he/she will be notified of the test stages and when the VM is ready for testing. For the managed VMs, if 'Restart' option is selected before the test, the VM should be put in Customer Maintenance or Temp Admin state
Reconfigure vCPU
This action is only available within the vRA portal and if the VM is switched off. The user can reconfigure vCPU cores, cores per socket and sockets configuration of the VM. Please note that after using this action, changing vCPU via the above 'Reconfigure' operation for the VM will be restricted and further vCPU settings of he VM can be done only via 'Reconfigure vCPU'.
Change Backup Policy
With this actions it's possible to read and change the current backup policy for Imaged-based backups (IBB) (which defines, for example, the retention time of the backups and their backup schedule). For details see here.
Change Password
With this action it's possible to change the root password.
Create Backup
With each submit of this action, a user requests to create immediately an additional Imaged-based backup (IBB). For details see here.
Create Snapshot
A snapshot captures the current state of the VM. This state can be restored at a later stage. The procedure for creating, restoring and deleting a snapshot is described here.
For a virtual machine, a maximum of 3 snapshots can be generated.
Delete Snapshot
The action will delete a snapshot which was created with the "Create Snapshot" action.
Destroy VM
This action will delete the VM.
Power Cycle
This is a hard reset of the virtual machine, basically equivalent to pulling the power and turning it back on.
Power On
This action will power on the operating system of the virtual machine.
Power Off
This action will shutdown the operating system of the virtual machine.
Reboot
This action will reboot the operating system of the virtual machine.
Restore Data
This action allows to restore the hard disks' data of a selected Virtual Machine from an available Imaged-based backup (IBB). Also, this action allows to restore a deleted Virtual Machine from such a backup.
For details, see here.
Restore File or Folder
This action allows to restore a single file or a complete folder from an available Imaged-based backup (IBB) back onto a Virtual Machine.
For details, see here.
Restore to New
This action allows to restore a Virtual Machine (VM) from an available Imaged-based backup (IBB) to a new VM. The result is a newly created machine which will leave the original VM unchanged.
For details, see here.
Revert To Snapshot
The action will revert the VM to a snapshot which was created with the Create Snapshot action. After the snapshot is rolled back, the VM is turned off and needs to be powered on again.
Shutdown
This action will shutdown the virtual machine.
Suspend
This action will suspend the virtual machine.
View Backup Status
The action View Backup Status allows a user to view the currently enabled backup policy and the available backups on the selected machine.
More details about Backup and Restore is described here.
View Properties
This action shows custom properties for the Managed OS VM. After submitting the action, the custom properties will be visible on the vRA requests detail page.
Upgrade VM Hardware Version
This action provides two options for upgrading the Virtual Machine Hardware Version to the latest version that is supported by the ESXi host. The first one is an immediate upgrade which you can select with the "Upgrade now?" checbox. In this use case, the Virtual Machine will be powered off and after upgrading the Hardware Version it will be powered on again. The second option is to schedule the upgrade to the next reboot of the Virtual Machine by not checking the "Upgrade now?" checkbox.
Supported VMware Tools are required and the operation will fail if they are not installed.
If the Hardware Version already is the latest supported one, the operation will finish with success immediately without performing any tasks.
Creating a Snapshot before performing this operation is recommended.
You can find the detailed documentation of our vendor here.
Update Custom Property
This day2 action allows you to update the custom property on a Virtual Machine. > Under My Items, filter by Owned by Me and go to the Virtual Machine where you want to update the custom property.
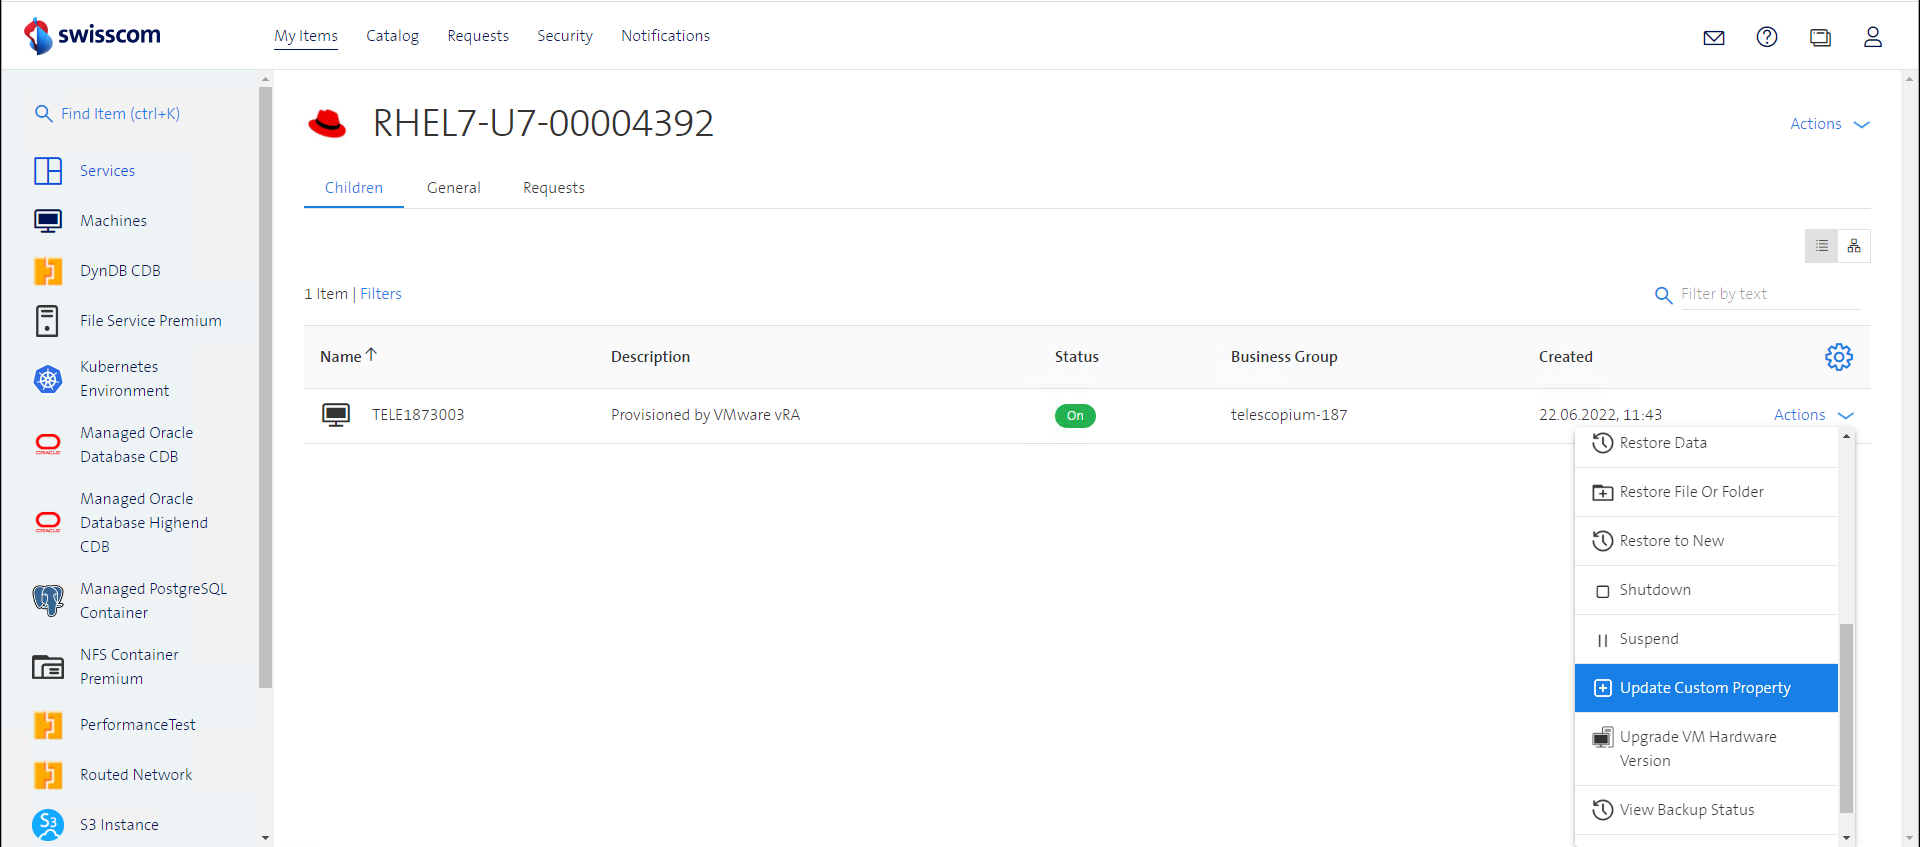
To update the user defined custom property value for a Virtual Machine, choose the day2 action Update Custom Property:
Select Property: Drop down list with all available Custom Properties.
Edit value: Edit the value for the selected Custom Property.
Update Custom Property: Apply the changes of the updated Custom Property to the selected VM.
As a result of this operation the Custom Property will be updated and the changes will be applied to the virtual machine.
Patching infrastructure
Windows
Swisscom provides an unmanaged WSUS (Windows Server Update Service) in ESC. This service can be used to provide Windows Server operating systems with the latest Microsoft patches. The main advantage is that the workload doesn't need a direct Internet connection to Microsoft Update.
The WSUS is unmanaged and provides no individual patch management options for customer purposes.
| WUServer | WUStatusServer |
|---|---|
| http://138.188.244.8:8530 | http://138.188.244.8:8530 |
| http://psrv00wsus01.sccloudinfra.net:8530 | http://psrv00wsus01.sccloudinfra.net:8530 |
RHEL
Swisscom provides a Red Hat Satellite service in ESC. This service can be used to provide RHEL VMs with the latest Red Hat packages. This service has the main advantage of allowing workloads to receive updates without requiring a direct internet connection to Red Hat. The workloads are connected to the Satellite infrastructure via a dedicated Capsule Server.
The Satellite service is unmanaged. It does not provide any individual patch management options for customers.
| Capsule server for unmanaged RHEL |
|---|
| pcms2capsule-5.prd.cms.sccloudinfra.net |
In order to register a new client to the Satellite infrastructure, the following steps are needed:
Step 1: Login to the client you wish to register to Satellite
Step 2: Make sure you can reach the Satellite infrastructure on port TCP/443
Test the connection with curl.
# curl -k https://pcms2capsule-5.prd.cms.sccloudinfra.net/pub/
If you cannot connect to the destination Capsule server it may be necessary to open the firewall. In that case, create a firewall rule with the following parameters:
Source: Your VM
Destination: pcms2capsule-5.prd.cms.sccloudinfra.net
Service: TCP 443
Step 3: Download and run the Satellite registration script:
# curl -s -k https://pcms2capsule-5.prd.cms.sccloudinfra.net/pub/register-client.sh | sh
=> Check major OS version
  => OK, found Red Hat Enterprise Linux version 8, done!
=> Retrieve and store CA certificate
  => OK, done!
=> Configure RHSM
  => OK, done!
=> Register to pcms2capsule-5.prd.cms.sccloudinfra.net
The system has been registered with ID: fd8f20da-62c8-41fb-8bb2-a3dd8d49233a
The registered system name is: psrv00rh8tst01
  => OK, done!
=> Clean YUM cache
  => OK, done!
=> OK, all done! Have fun :-)
Step 4: Confirm that you have now access to all the required repositories:
Output RHEL 7 VM:
# yum repolist
Loaded plugins: product-id, search-disabled-repos, subscription-manager
rhel-7-server-rpms                                                                            | 3.5 kB  00:00:00
(1/3): rhel-7-server-rpms/7Server/x86_64/group                                                | 631 kB  00:00:00
(2/3): rhel-7-server-rpms/7Server/x86_64/updateinfo                                           | 4.3 MB  00:00:00
(3/3): rhel-7-server-rpms/7Server/x86_64/primary_db                                           |  97 MB  00:00:01
repo id                                     repo name                                  status
!rhel-7-server-rpms/7Server/x86_64          Red Hat Enterprise Linux 7 Server (RPMs)   34,131
repolist: 34,131
Output RHEL 8 VM:
# yum repolist
Updating Subscription Management repositories.
repo id                                                  repo name
rhel-8-for-x86_64-appstream-rpms                         Red Hat Enterprise Linux 8 for x86_64 - AppStream (RPMs)
rhel-8-for-x86_64-baseos-rpms                            Red Hat Enterprise Linux 8 for x86_64 - BaseOS (RPMs)
Output RHEL 9 VM:
# yum repolist
Updating Subscription Management repositories.
repo id                                                  repo name
rhel-9-for-x86_64-appstream-rpms                         Red Hat Enterprise Linux 9 for x86_64 - AppStream (RPMs)
rhel-9-for-x86_64-baseos-rpms                            Red Hat Enterprise Linux 9 for x86_64 - BaseOS (RPMs)
Step 5: Optionally enable/disable additional repositories:
List repositories provided by Swisscoms Satellite infrastructure:
# subscription-manager repos --list
+----------------------------------------------------------+
Available Repositories in /etc/yum.repos.d/redhat.repo
+----------------------------------------------------------+
Repo ID:   rhel-8-for-x86_64-baseos-rpms
Repo Name: Red Hat Enterprise Linux 8 for x86_64 - BaseOS (RPMs)
Repo URL:  https://pcms2capsule-5.prd.cms.sccloudinfra.net/pulp/content/sc-unmanaged-os/LIVE/ccv_rhel8/content/dist/rhel8/$releasever/x86_64/baseos/os
Enabled:   1

Repo ID:   codeready-builder-for-rhel-8-x86_64-rpms
Repo Name: Red Hat CodeReady Linux Builder for RHEL 8 x86_64 (RPMs)
Repo URL:  https://pcms2capsule-5.prd.cms.sccloudinfra.net/pulp/content/sc-unmanaged-os/LIVE/ccv_rhel8/content/dist/rhel8/$releasever/x86_64/codeready-builder/os
Enabled:   0

Repo ID:   rhel-8-for-x86_64-appstream-rpms
Repo Name: Red Hat Enterprise Linux 8 for x86_64 - AppStream (RPMs)
Repo URL:  https://pcms2capsule-5.prd.cms.sccloudinfra.net/pulp/content/sc-unmanaged-os/LIVE/ccv_rhel8/content/dist/rhel8/$releasever/x86_64/appstream/os
Enabled:   1
Enable repository:
# subscription-manager repos --enable codeready-builder-for-rhel-8-x86_64-rpms
Repository 'codeready-builder-for-rhel-8-x86_64-rpms' is enabled for this system.
Disable repository:
# subscription-manager repos --disable codeready-builder-for-rhel-8-x86_64-rpms
Repository 'codeready-builder-for-rhel-8-x86_64-rpms' is disabled for this system.
VM configuration recommendations
All ESC hypervisors provide 56 cores and 1.5TB of RAM out of 2 physical sockets, so 28 cores and 768GB of RAM per socket.
If you exceed one of those maximums, it automatically uses a 2nd NUMA. When then running a heavy load, it can slow down both cores. To avoid such situations, we recommend not using more than 24vCPU and 512GB of RAM per VM. This configuration will provide spare capacities. If another VM is having a high demand on the same CPU or RAM there would still be sufficient resources left.
NUMA and its handling
In regards on the hypervisor we are using, there are limitations due to Non-Uniform Memory Access (NUMA). NUMA is the design used by the host for multiprocessing, where the memory access time depends on the memory location relative to the processor.
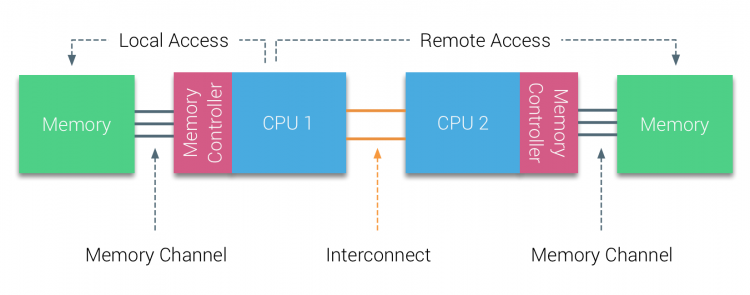
Based on that, this means that the VM, as soon as there are more resources in use than 1 NUMA can provide, the performance decreases, as the interconnect between the CPU's is not performing on the same level as the memory channel.
In addition, when a VM then consumes 2 NUMA at its peak, the performance can decrease for all VMs running on this particular host.
vNUMA
The handling of vNUMA is automatically done by the system. The customer has the advantage of not taking care of the manual socket/core configuration, as the system will assign it automatically.
An advanced setting to adjust the vNUMA manually is currently not available for the customer.
Sizing Principles
There are two main sizing options available to specify the size of a virtual machine:
- Number of CPUs
- Size of Memory
Generally, you should size a VM as small as possible, so it delivers acceptable performance during peak hours and good performance on average. Due to the design of the underlying hypervisor, smaller VMs often perform better, if not over-utilized, compared to larger VMs. This means that over-sizing a VM does not guarantee better performance. Therefore, it is important to constantly monitor the utilization of all VMs and regularly resize VMs based on the historic performance needs. Unless you are expecting a spike in utilization, this will deliver the highest performance and lowest cost over time.
Additionally, you should be very careful when taking use of certain VM sizes:
- Assigning over 28 cores
When you assign more than 24 cores to one VM, you will span across multiple physical processor nodes. Depending on the specific application that runs within the VM, this might negatively affect performance. Be careful when configuring VMs of this size and benchmark your application in order to make sure that the effective performance of your application is improving. - Assigning over 720 GB of RAM
Similar to the number of cores, you will most likely span across multiple physical memory nodes when configuring more than 720 GB of RAM. Therefore, you should also verify that you actually need this amount of RAM and effectively gain performance when going over this size.
Finally, you should consider the CPU to memory rate. In order to avoid misalignment on the physical hardware, you should consider not configuring a high number of CPU with very low memory or vice versa. The following table gives you a guideline how much memory you should assign per core:
| CPUs | Memory per core min-max |
|---|---|
| 1-8 | 2 - 32 |
| 9-22 | 4 - 32 |
| 23-32 | 4 - 44 |
Workload Considerations
The Enterprise Service Cloud operates within a shared environment where physical hardware resources are allocated across multiple virtual machines, meaning they cannot be assigned exclusively. Allocated resources may not consistently deliver steady performance. However, the utilization of physical hardware is constantly monitored and adjusted to maintain the expected performance level.
Performance from the ESC workload in this shared environment can fluctuate due to differing workloads. These workloads are placed on nodes that can support the necessary performance. If the host's capacity or performance situation changes, the workloads hosted on it are relocated to ensure optimal performance at all times. Be aware, though, that these workload migrations may cause short-term performance variations during the process.
The Enterprise Service Cloud is engineered for general-purpose workloads and may not be suitable for specific uses such as data analytics, machine learning/artificial intelligence, near-real-time tasks (such as voice or video applications), or other high-performance computing scenarios.