Span or Stripe Disks
As there is a limitation of 4TB for a a single Virtual Machine Disk (VMDK) in ESC, volumes within the guest OS need to be spanned or striped if they have to be larger than 4TB.
Span:
- Data is written sequentially to each disk in the spanned volume
- Can be extended with additional disks if required
Stripe:
- Data is written to all disks in the volume parallel, leads to better performance of the volume
- After initial configuration of the striped volume, it cannot be extended later on
Configure the disks in a Windows VM
If you have added a disk to a Windows VM, you can use the following procedure to make the disk usable in your Windows VM. The example below is for a Windows Server 2012R2 VM.
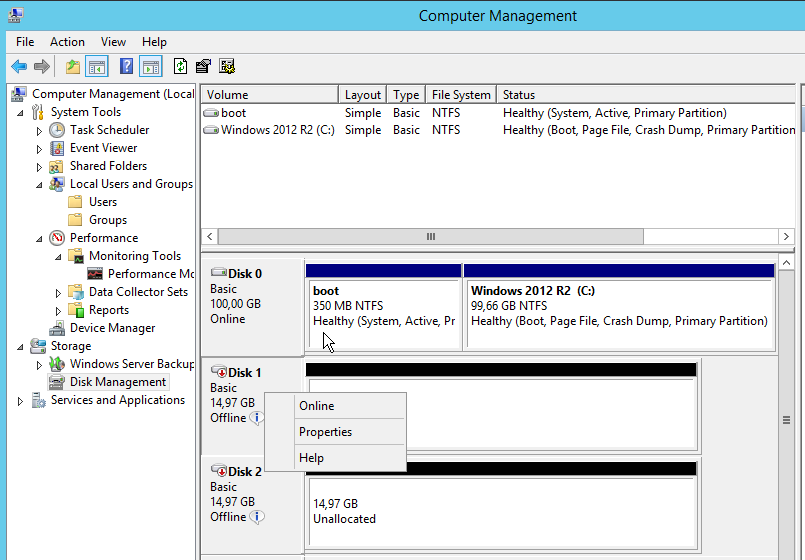
Step 1: Navigate to Disk Management in the Computer Management of the Windows Server. Bring the disks online and initialize the disks if needed.
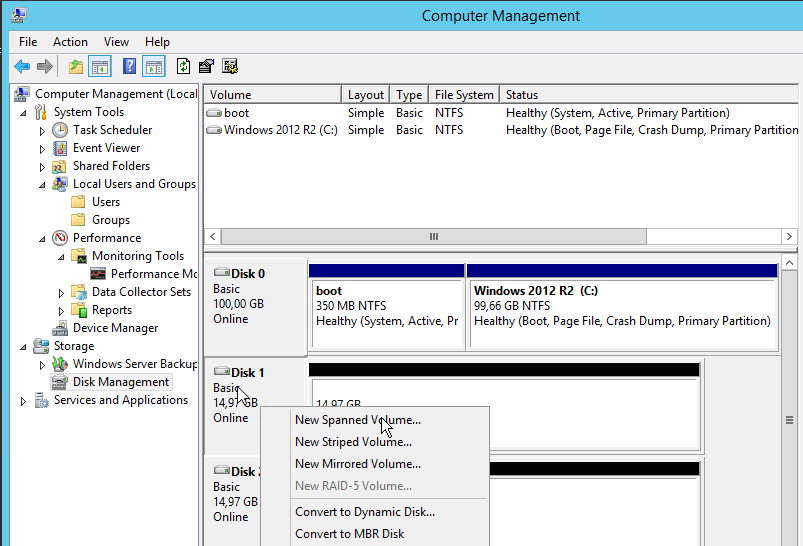
Step 2: Right click one of the disks and select "New Spanned Volume". Click next.
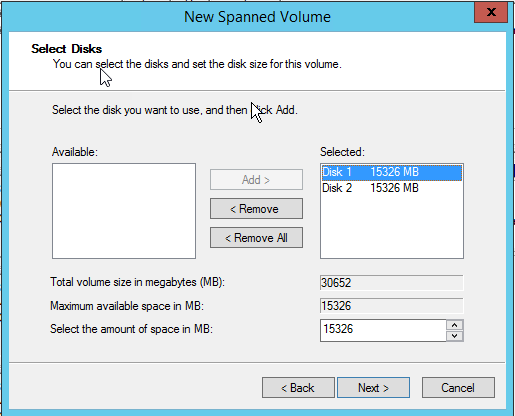
Step 3: Move all disks which should be part of the new volume to the right. Click next.
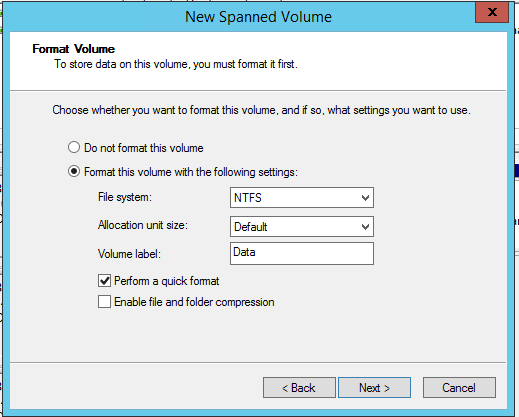
Step 4: Do all configurations as needed, add a volume name and select "Perform a quick format". Click next. Click Finish.
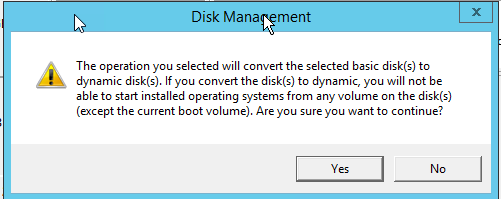
Step 5: Accept the warning. For a spanned volume, all disks need to be converted into dynamic disks.
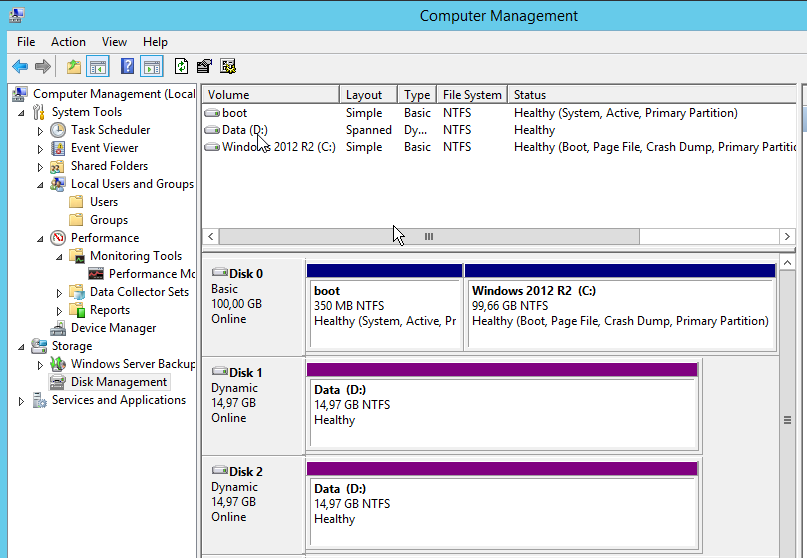
Step 6: Check that newly created volume has drive letter D and is spanned.
Configure the disks in a Linux VM
If you have added a disk to a Linux VM, you can use the following procedure to make the disk usable in your Linux VM. The example below is for a RedHat Linux 7u4 VM.
Step 1: Prepare the disk partitions. In this example, the used disks are at /dev/sdb and /dev/sdc.
[root@localhost ~]# pvcreate /dev/sdb
  Physical volume "/dev/sdb" successfully created.

[root@localhost ~]# pvcreate /dev/sdc
  Physical volume "/dev/sdc" successfully created.
Step 2: Create a volume group.
[root@localhost ~]# vgcreate my_volume_group /dev/sdb /dev/sdc
  Volume group "my_volume_group" successfully created
Step 3: Verify the volume group. Check that the VG Name and the total VG Size are correct. The VG Size should be the total amount of space in all two of your disks.
[root@localhost ~]# vgdisplay my_volume_group
  --- Volume group ---
  VG Name               my_volume_group
  System ID
  Format                lvm2
  Metadata Areas        2
  Metadata Sequence No  1
  VG Access             read/write
  VG Status             resizable
  MAX LV                0
  Cur LV                0
  Open LV               0
  Max PV                0
  Cur PV                2
  Act PV                2
  VG Size               4.99 GiB
  PE Size               4.00 MiB
  Total PE              1278
  Alloc PE / Size       0 / 0
  Free  PE / Size       1278 / 4.99 GiB
  VG UUID               gh6onu-1LkD-rM6z-mfLN-SZVh-wEOk-ELtsoA
Step 4: Create a logical volume on top of the volume group.
Spanning: You can make the logical volume any size you like. (It is similar to a partition on a non LVM setup.) For this example we will create just a single logical volume of size 1GB on the volume group.
[root@localhost ~]# lvcreate -L1G -nmy_logical_volume my_volume_group
  Logical volume "my_logical_volume" created.
Striping: You can make the logical volume any size you like (up to the size of the VG you are creating it on; it is similar to a partition on a non LVM setup). For this example we will create just a single logical volume of size 1GB on the volume group. The logical volume will be a striped set using for the 4k stripe size. This should increase the performance of the logical volume.
[root@localhost ~]# lvcreate -i2 -I4 -L1G -nmy_logical_volume my_volume_group
  Logical volume "my_logical_volume" created.
Step 5: Create an ext4 file system on the logical volume
[root@localhost ~]# mkfs.ext4 /dev/my_volume_group/my_logical_volume
mke2fs 1.42.9 (28-Dec-2013)
Filesystem label=
OS type: Linux
Block size=4096 (log=2)
Fragment size=4096 (log=2)
Stride=0 blocks, Stripe width=0 blocks
65536 inodes, 262144 blocks
13107 blocks (5.00%) reserved for the super user
First data block=0
Maximum filesystem blocks=268435456
8 block groups
32768 blocks per group, 32768 fragments per group
8192 inodes per group
Superblock backups stored on blocks:
        32768, 98304, 163840, 229376

Allocating group tables: done
Writing inode tables: done
Creating journal (8192 blocks): done
Writing superblocks and filesystem accounting information: done
Step 6: Mount the file system on the logical volume
[root@localhost ~]# mount /dev/my_volume_group/my_logical_volume /mnt
Step 7: Create an /etc/fstab entry to mount the filesystem persistent after each reboot.
[root@localhost ~]# echo "/dev/mapper/my_volume_group-my_logical_volume /mnt ext4 defaults 0 0" >> /etc/fstab
Step 8: If everything worked properly, you should now have a logical volume mounted at /mnt.
[root@localhost ~]# df -h /mnt
Filesystem                                     Size  Used Avail Use% Mounted on
/dev/mapper/my_volume_group-my_logical_volume  976M  2.6M  907M   1% /mnt