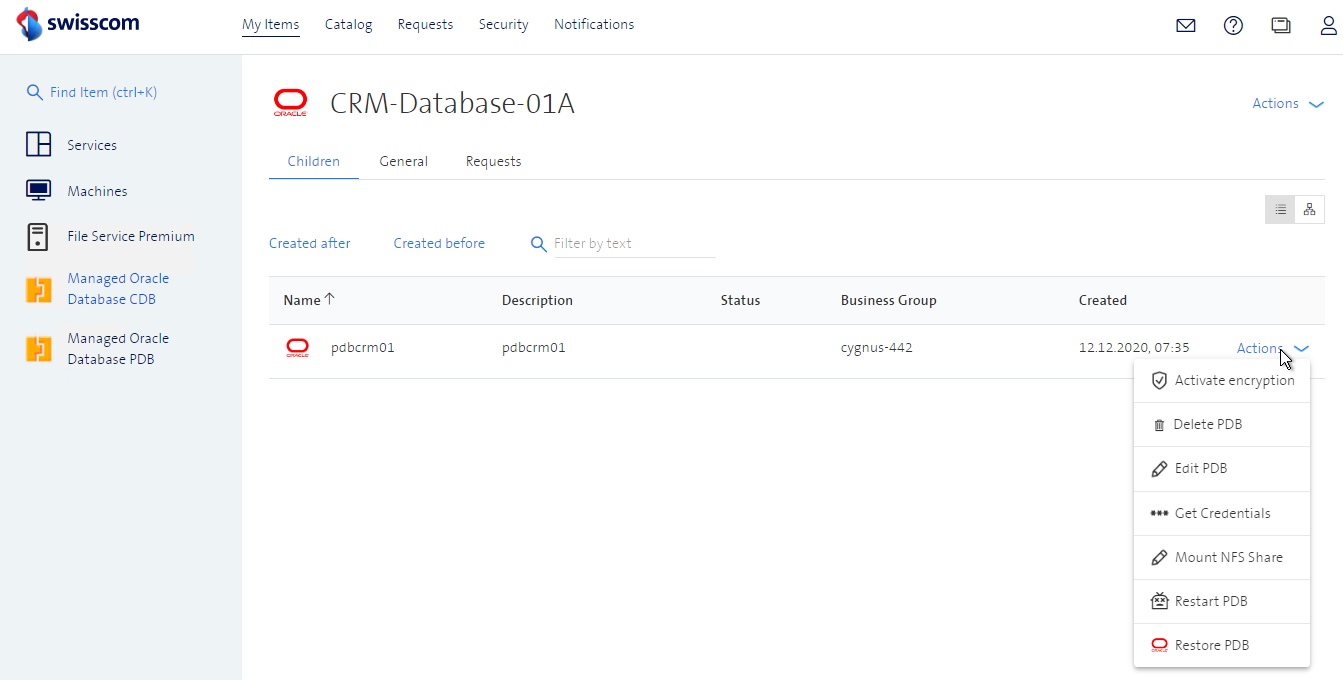
PDB Resource Actions
With the PDB resource actions you can edit and modify an existing PDB. The picture below shows all available resource actions.
Pls. reference the API documentation for the detailed specification of the available PDB resource actions.
Activate Encryption (TDE)
Tablespaces can be encrypted by using Oracle Transparent Data Encryption (TDE). Once enabled, TDE cannot be disabled. If TDE is enabled, new tablespaces will be automatically encrypted. Existing tablespaces are not automatically encrypted after enabling TDE. They need to be encrypted by applying the following SQL:
ALTER TABLESPACE xyz ENCRYPTION ONLINE ENCRYPT;
Encryption can be activated in the vRA GUI and with the API.
Note: be aware that Oracle TDE is part of the Oracle ADVANCED Security Option (ASO). ASO is available with Oracle Enterprise Edition EE only, and needs to be properly licenced.
Active TDE functionality by pressing the Activate encryption button.

Delete PDB
Note: Make sure the Service Bindings / PDB credentials are deleted before deleting the PDB instance. Platforms MUST delete all Service Bindings for a Service Instance prior to attempting to deprovision the Service Instance.
The deletion has to be confirmed in the checkbos before pressing the Delete PDB button.

Edit PDB
Edit PDB includes the following actions to be executed on a PDB instance:
- Change PDB Friendly Name
- Select Lockdown Profile
- Change Support Hours
- Enable Oracle Text Option
- Change Security Shape
Changes will be provisioned after pressing the Edit PDB button.
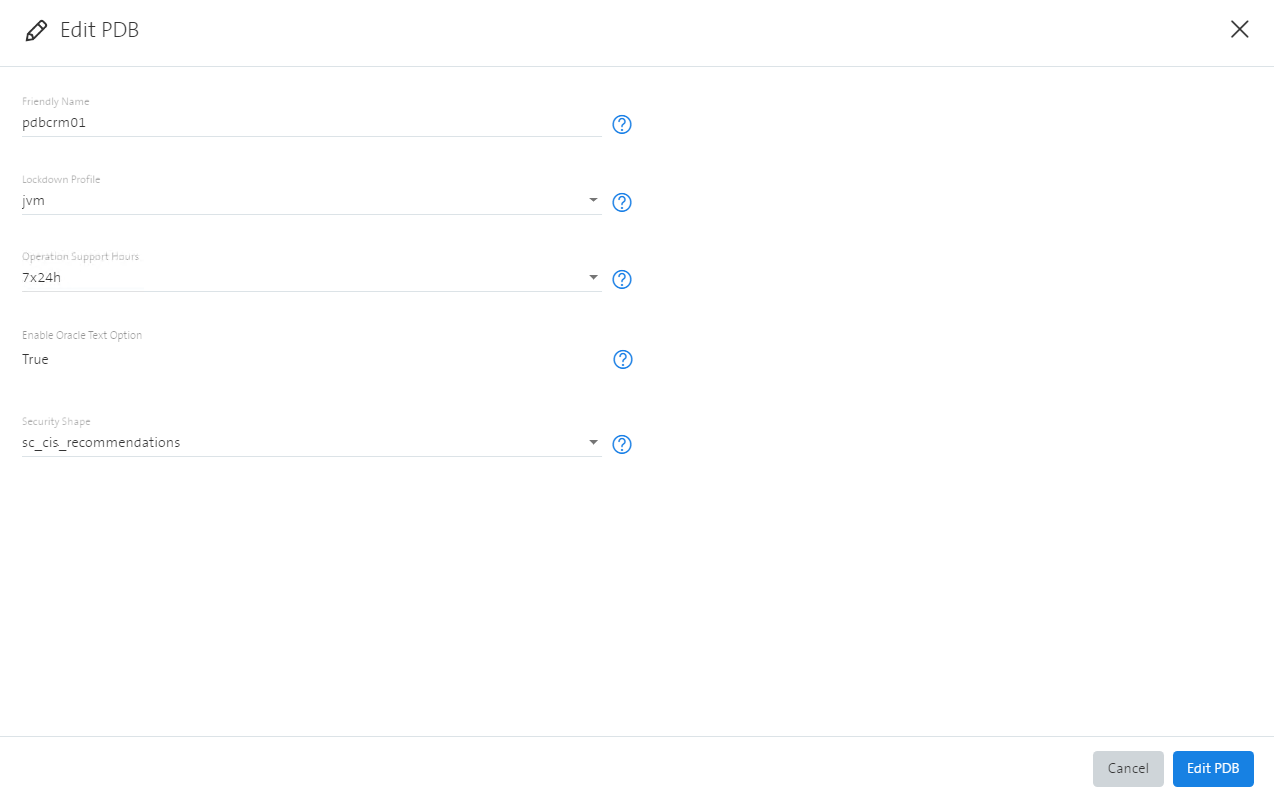
Friendly Name: The friendly name of a PDB is used to identify the corresponding instance on the bill and on consumption reports. With the friendly name, the customer can apply an individual naming concept, independent of the system generated unique name (CON_NAME). In addition, the CON_ID for unambiguous identification of the PDB is used internally.
- Format: Characters (letters, numbers and whitespaces)
Lockdown Profiles: Three different lockdown profiles are available (see lockdown profiles):
- default
- jvm
- restricted
The lockdown profile can be changed as day-2 action after PDB creation.
Support Hours: Support hours determine the period in which the PDB is monitored and when incidents to this PDB are worked on. Support hours can be changed in the vRA GUI only. There are two options:
- "Office hours" (default)
- "7x24h"
Pls. refer to "Leistungsbeschreibung Managed Oracle DB Service - Regular" for the definition of Office hours.
Text Option: If this option is selected, the Oracle Text option will be installed within the database.
Security Shapes: Define what an user can do in a database, for example "CREATE TABLESPACE". Three different Security Shapes are available. A shape can be changed as day-2 action after PDB creation.
- sc_ora_default
- sc_cis_recommendations
- sc_sec_practises
Get Credentials
See Get Credentials above in Create PDB.
Mount NFS Share
I order to export/import data, an NFS share needs to be mounted to the corresponding PDB. Pre-requisite is an existing customer File Service share. For the mount operation in the vRA UI the NFS URI of the File Service share is required. These are the three portal components which has to be created in order by customer in his tenant in advance:
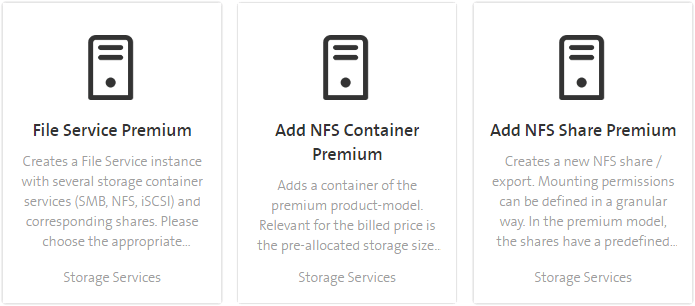
- File Service Premium - enable the service, requires customer defined parameters like uplink toplogy, aggregate and network settings
- Add NFS Container Premium - set NFS service class, performance and backup policy
- Add NFS Share Premium - configure NFS mount options
How to mount NFS to a Pluggable Database PDB:
If the requirements are fulfill, the NFS share can be added on PDB level by selecting Mount NFS Share in dropdown menu.

Only existing NFS shares can be selected in dropdown list. Press Mount_NFS_Share to attach the NFS to the selected Pluggable Database PDB.

To unmount the NFS share, select None in the NFS share dropdown list.
Once mounted, the mounted NFS is visible in the Pluggable Database PDB general information section:

The following steps are executed in the background:
- Checks if the nfs sub-folder is there (e.g. /u01/nfsdata/CDB00002_B/PDB000020001/path_prefix/nfs)
- Mounts the customer NFS into the folder nfs
- Creates a directory object called NFS in the PDB and grants permissions to database user PDBADMIN
- This directory object is used for data export/import actions
Example for an attached NFS share which is ready for export/import actions:
SQL> SELECT directory_name, directory_path
  2  FROM dba_directories
  3  WHERE directory_name='NFS';

DIRECTORY_NAME  DIRECTORY_PATH
--------------- ------------------------------------------------------------
NFS             /u01/nfsdata/CDB00100/PDB001000001/path_prefix/NFS-A-01
See also API documentation for NFS.
Restart PDB
The Pluggable Database will be restarted, existing connections closed.
PDB will be restarted after pressing the Restart PDB button.

Restore PDB
Be aware, that database restore can be a very resource intensive operation. Especially restoring large databases can exeed the standard configuration settings and resources. Pls. consult chapter Large Data Operations before restoring a large PDB.
The PDB can be restored to any point-in-time within the retention period. Currently, the retention period is 11 days. The timestamp must not point into the future and must not point back more than 11 days. Otherwise an error message will be returned. If you try to restore from a timestamp without a backup available, the restore will fail.
The format of the timestamp is ISO Instant (UTC), e.g. '2011-12-03T10:15:30Z' See also API documentation for Restore PDB for details.
In the vRA UI, the point-in-time timestamp dropdown values are presented in 15 minute intervalls. Nevertheless, you can edit the timestamp manually to the exact minute. Possible timestamp format in vRA UI:
YYYY-MM-DD HH24:MI (example: 2021-04-26 17:30)
or
YYYY-MM-DDTHH24:MI:SS+02:00 (example: 2021-04-26T15:30:00+02:00)

PDB will be restored after pressing the Restore PDB button.
Note: Be aware, that the restore operation overwrites the existing PDB.