Disk Management
Managed RHEL distinguishes between file systems belonging to the basic Operating System and file systems belonging to the customer application. The base Operating System file systems must not be changed:
- The size of the Operating System disk must not be changed
- The size of the basic Operating System file systems must not be changed
- The content of the basic Operating System file systems must not be changed
- It is not allowed that the customer applications write data into the basic Operating System file systems
On the other hand, the customer is responsible for configuring additional disks and file systems for the customer application. The steps for adding, editing and removing additional disks are described below. Please respect the noted disk requirements.
Disk Requirements
The following conditions must be met:
- You must never change the OS disk configuration on the Operating System!
- The maximum size of any single disk is 4096 GB.
- The maximum number of allowed local disks is 10.
- The cumulated maximum size for all local disks is 10240 GB.
When manual Disk Management is not enabled also the following conditions must be met:
- You must never change the disk configuration on the Operating System!
- You must never change the disk configuration on the Operating System with LVM commands!
- You must never change the mount point in
/etc/fstabfor a local disk! - Only use the Manage Disks Action in the portal to modify your local disks.
The Managed RHEL file system layout which must never change is documented here.
Remark: If you change the disk configuration for local disks within the Operating System, the Manage Disks action is not aware of this change. Therefore, future Manage Disks actions cannot be correctly configured by the automation. Only when you attach network filesystems (NFS), it is allowed to add them manually to /etc/fstab.
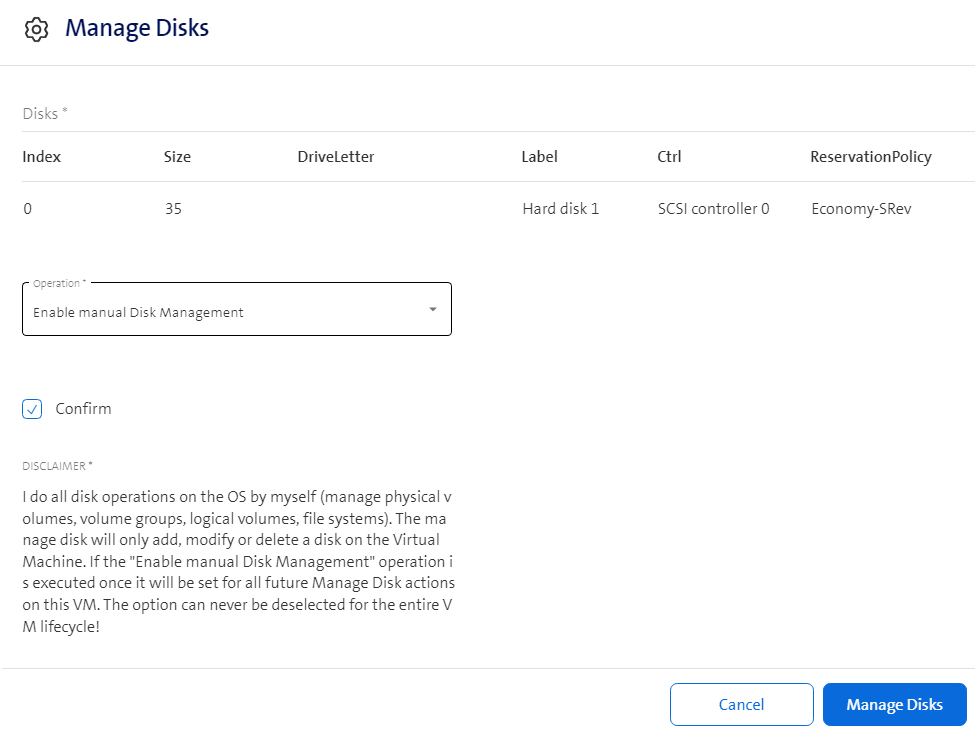
Enable manual Disk Management
The Manage Disk action configures the disk for you on the OS (including LVM configuration, create mount point, create filesystem and add /etc/fstab entry). If you want to configure the disk on the OS yourself, you have the option to Enable manual Disk Management for a VM.
This means you do all disk operations on the OS by yourself (manage physical volumes, volume groups, logical volumes, file systems). The Manage Disks action will only add, modify or delete a disk on the Virtual Machine, but no action on the OS is executed. If the Enable manual Disk Management operation is executed once, it will be set for all future *Manage Disks" actions on this VM. The option can never be deselected for the entire VM lifecycle!
As the disk configuration is done manually on the OS, it is possible that driveletter/mount-point and label/disk-label in the table on the "Manage Disks" action does not reflect the reality. Please carefully check on which disk you want to execute an edit or delete action.
Add disk for a new VM
It is possible to add additional disks to a VM during the VM ordering process.
When ordering a Swisscom RHEL VM, there is a Storage tab, where you can configure additional disks. The Disk0 is reserved for the Operating System. Therefore, do not edit the Disk0 except the Disk0.Policy. Configure the storage reservation policy, disk size in GB, the mount point and the logical volume name (Disk Label). The mount point and the logical volume name must be filled out and both fields must be unique!

The workflow adds the disk to the VM, creates the partitions, adds the disk to the datavg volume group, creates the logical volume, creates the XFS file system and creates the entry in /etc/fstab.
$ df -hP /opt/application
Filesystem                Size  Used Avail Use% Mounted on
/dev/mapper/datavg-applv  5.0G   68M  5.0G   2% /opt/application

$ cat /etc/fstab
...
/dev/mapper/datavg-applv /opt/application xfs noatime 0 0
Remark: If you change the disk configuration within the Operating System, the Manage Disks action is not aware of this change, and you will never again be able to modify the disk configuration in the portal!
Add disk for an existing VM
Use the following procedure to add a disk for an existing VM:
- Select the VM for which you want to add a disk in the portal
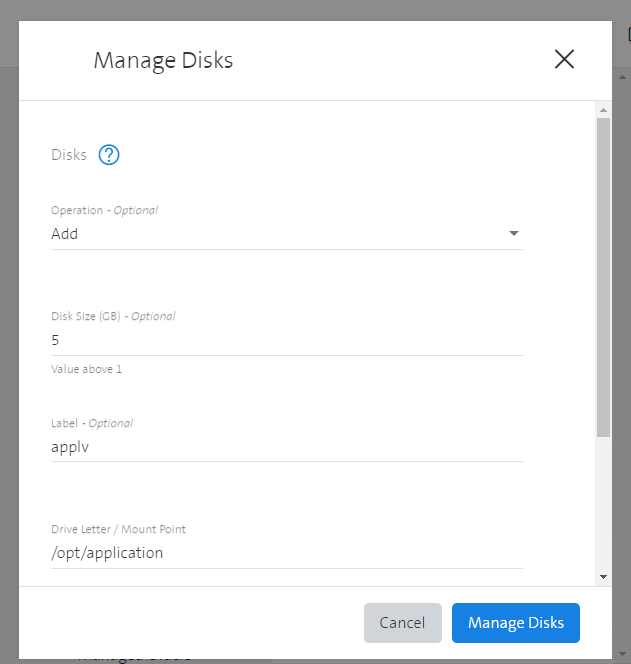
- Select the Manage Disks action
- Select the Add operation
- Configure the disk size in GB, the logical volume name (Label), the mount point and the storage reservation policy for the new disk, and click Manage Disks. The mount point and the logical volume name must be filled out and both fields must be unique!
The workflow adds the disk to the VM, creates the partitions, adds the disk to the datavg volume group, creates the logical volume, creates the XFS file system and creates the entry in /etc/fstab.
$ df -hP /opt/application
Filesystem                Size  Used Avail Use% Mounted on
/dev/mapper/datavg-applv  5.0G   68M  5.0G   2% /opt/application

$ cat /etc/fstab
...
/dev/mapper/datavg-applv /opt/application xfs noatime 0 0
Remark: If you change the disk configuration within the Operating System, the Manage Disks action is not aware of this change, and you will never again be able to modify the disk configuration in the portal!
Edit disk
Use the following procedure to add a disk for an existing VM:
- Select the VM for which you want to add a disk in the portal
- Select the Manage Disks action
- Select the Edit operation
- Select the disk which you want to edit with the
Disk Index.The disk 0 is reserved for the Operating System. Therefore, it is not possible to edit the disk 0. - Configure the new disk size in GB and click Manage Disks
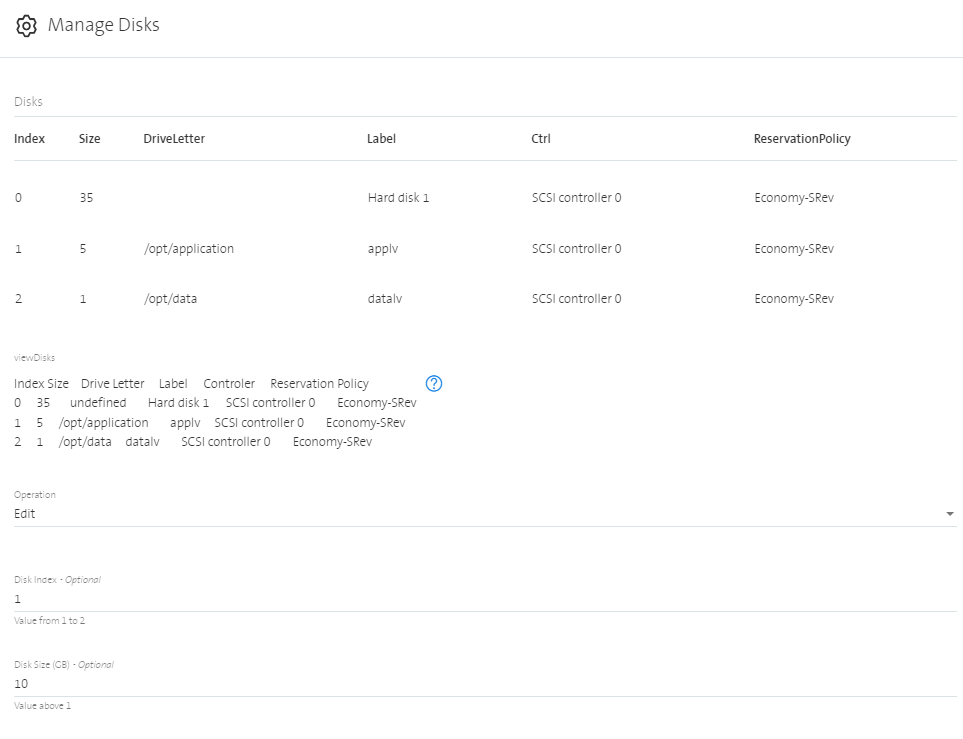
The workflow edits the disk on the VM, creates new partitions, adds the new partition to the datavg volume group, increases the logical volume and increases the XFS file system.
$ df -hP /opt/application
Filesystem                Size  Used Avail Use% Mounted on
/dev/mapper/datavg-applv   10G  104M  9.9G   2% /opt/application
Remark: If you change the disk configuration within the Operating System, the Manage Disks action is not aware of this change, and you will never again be able to modify the disk configuration in the portal!
Shrink disk
Change mountpoint
Unfortunately, it is not possible to change the mountpoint with the Manage Disks action. However, it is also not possible to change the mount point by simply adjusting /etc/fstab. Because then the Manage Disks action does not notice this change, and the disk can no longer be edited with the Manage Disks action.
Select the VM for which you want to delete a disk in the portal
Select the Add operation
Configure the disk size in GB, the logical volume name (Label), the new mount point and the storage reservation policy for the new disk, and click Manage Disks
Manually copy the content from the old mountpoint to the new mounted disk.
cp -rp /old /newCheck that everything is copied correctly to the new mountpoint.
Select the Delete operation
Select the disk which is mounted on the old mountpoint with the
Disk Index.WARNING: Check that you have selected the correct disk. The disk is deleted without further inquiry!
Click Manage Disks
Delete disk
Use the following procedure to add a disk for an existing VM:
- Select the VM for which you want to delete a disk in the portal
- Select the Manage Disks action
- Select the Delete operation
- Select the disk which you want to delete with the
Disk Index. The disk 0 is reserved for the Operating System. Therefore, it is not possible to delete the disk 0. - WARNING: Check that you have selected the correct disk. The disk is deleted without further inquiry!
- Click Manage Disks
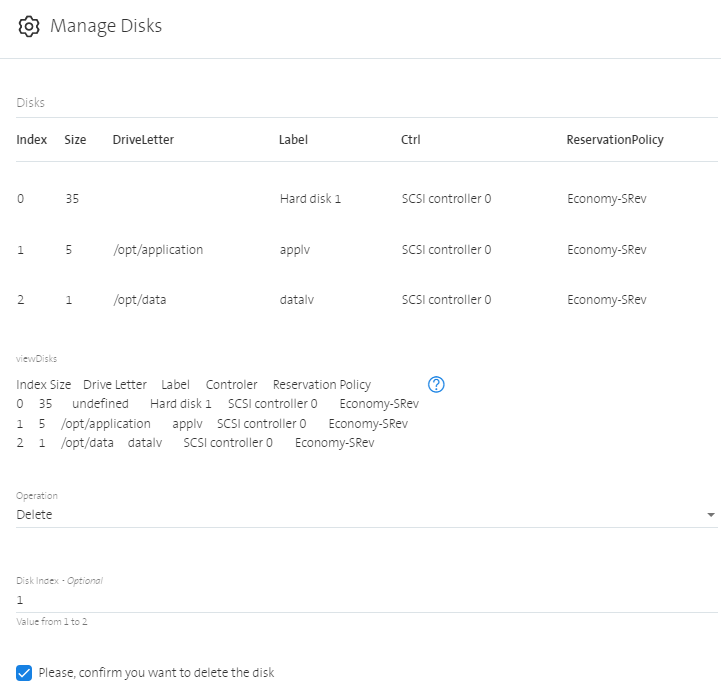
The workflow umounts the disk, deletes the disk on the VM and deletes the entry in /etc/fstab.
Remark: If you change the disk configuration within the Operating System, the Manage Disks action is not aware of this change. Therefore future Manage Disks actions cannot be correctly configured by the automation.